Showing posts with label Guest Posts. Show all posts

Monday, June 25, 2012

Lemon Poppyseed Cake with Raspberry Curd and Lemon Buttercream Frosting

Since I am at Girl's Camp my sister, Emily is helping me out.  Yeah!!!

That's one long title for such a simply delicious dessert. I didn't even mention the candied lemon part, sheesh!
This cake is a lemon lovers dream! I was asked to make a cake for a family friend with the specifications of "oh just something lemon." So lemon I made! The raspberry curd sets off the lemon nicely makes and it's so that you don't slip into a lemon coma (Not that a lemon coma is a bad thing!). Maybe I should rename this to the near lemon coma cake. Now that has a nice ring to it!  It's way shorter too. All in favor of a name change signify with an "aye."
I'd say we're all in favor. [:


Lemon Poppy Seed Cake with Raspberry Curd and Lemon Buttercream Frosting

(click here for printable version)

Ingredients:
For cake:
2 1/3 cups cake flour
2 3/4 tsp. baking powder
1/4 tsp. salt
1 1/2 tbsp. poppy seeds
5 large egg whites, at room temperature
1/4 tsp. tsp cream of tartar
1 1/2 cups sugar
2 tbsp. finely grated lemon zest
12 tbsp. unsalted butter, at room temperature
1 cup whole milk

For raspberry curd:
8 tbsp. unsalted butter
1 pint ripe raspberries or 12 oz. package frozen raspberries, thawed
5 large egg yolks, lightly beaten
3/4 cup sugar
pinch of salt
2-3 tsp. fresh lemon juice

For the lemon buttercream frosting:
16 tbsp. unsalted butter, at room temperature
2 tbsp. finely grated lemon zest
3 cups sifted confectioners sugar
3 tbsp. lemon juice

Fresh raspberries or a lemon for garnish

Directions:
To make the cake, position a rack in the middle of the oven & preheat the oven to 350 degrees. Butter and flour two 9 inch cake pans. Whisk together the flour, baking powder, salt and poppy seeds in a bowl; set aside. In the clean, dry bowl of an electric mixer fitted with the whisk attachment, beat the egg whites on medium speed until foamy. Add the cream of tartar and increase the speed to medium-high. Beat  just until stiff peaks form when the whisk is lifted. Transfer the egg whites into a separate bowl, clean the the mixer bowl and reattach it with the paddle attachment.

Add the butter to the mixer bowl and beat on medium speed until just blended. Reduce the speed until smooth. Gradually add sugar and beat until incorporated. Mix in the lemon zest. Beat the mixture on medium-high until light and fluffy. Add the 1/4 cup of the milk and beat until just blended. Reduce the speed to low and add the flour mixture alternately with the remaining milk in three batches, beginning and ending with the flour, scraping down the sides of the bowl as necessary. Beat until just blended. Using a rubber spatula, fold one quarter of egg whites into the batter, being careful not to deflate the mixture. Once incorporated, add the rest of the whites and gently fold in until well combined.

Pour the batter into the prepared pan & bake until golden and passes the toothpick test, about 19-21 minutes. Cool the pan on a wire rack for 10 minutes. Run a thin knife around the edges of the pan and gently turn the cake out. Allow to cool completely.

To make the raspberry curd, melt the butter in a large saucepan over medium heat. Add the raspberries, egg yolks, sugar and salt, andcook, mashing the berries. Stir frequently at first and then constantly at the end, until thickened, about 10 minutes. Pour mixture through a coarse strainer set over a bowl, pressing hard on the solids to extract as much liquid as possible. Cool to room temperature; the curd will continue to thicken as it cools. Stir in lemon juice to taste. Coverand refrigerate until ready to serve.

Cut the cake into rounds as desired. Layer the rounds with the cooled raspberry curd. Once layered, allow the assembled cakes to cool in the refrigerator to help them set. In the meantime, make the frosting. In the bowl of an electric mixer fitted with the paddle attachment, beat the butter and zest on medium speed until light and fluffy. Gradually add the sugar and beat until smooth. Add the lemon juice and beat for one minute longer.

Frost the chilled cakes with the lemon frosting and garnish with fresh raspberries or candied lemons as desired.

To make the candied lemons: slice a lemon very thinly with a serrated knife and poke out any seeds with a toothpick. Combine a cup of sugar and a cup of water in a saucepan over medium-high heat. Heat the mixture until the sugar is dissolved. Add the lemon slices to the misture so that they are in a single layer (none overlapping), reduce the hear to medium-low and let simmer for about 20 minutes, turning the slices at least once. Remove from heat and store lemons in the syrup until ready to use.

Cake Source: Annie's Eats
Candied Lemon source: Annie's Eats


Friday, May 18, 2012

Granny's Birthday Cake--Guest Post with Hammock Tracks

A big thanks to The Farm Girl for letting me post a recipe on this wonderful site. This past Sunday we celebrated my mother's birthday. When my wee girl heard that we were baking a cake she quickly grabbed the kitchen bar stool and drug it over to the mixer. We were both quickly dissapointed when I learned that the cocoa jar was completely empty. With chocolate cake slashed off the menu I turned to the pantry to see what kind of ingredients we could use to create another kind of cake. When you live far away from civilization you either become a better more creative cook, or go hungry. With the cost of gas, if you ran to town for cocoa your cake would cost more than the best bakery sells. Ultimately, we created this pumpkin sheet cake flavored with cardamom (one of my favorite spices) and coconut. For the icing we used a basic cream cheese base but added a can of crushed pineapple. Everyone raved about the cake, including my son who hates coconut. So it was either good, or he was very hungry. I hope you enjoy it, too.

Granny's Birthday Cake

(printer friendly version)
  • 1 (15 ounce) can canned pumpkin puree
  • 2 cups white sugar
  • 1 cup vegetable oil
  • 4 eggs
  • 2 cups all-purpose flour
  • 2 teaspoons baking soda
  • 1 teaspoon ground cinnamon
  • 1/2 teaspoon salt
  • 1 teaspoon cardamom
  • 1 cup coconut
Icing:
  • 8 oz cream cheese
  • 2 cups powdered sugar
  • 20 oz can crushed pineapple, well drained
Mix pumpkin, sugar, oil, and eggs in mixer until well combined. Combine flour, soda, cinnamon, cardamom, and salt. in small bowl and slowly incorporate into wet ingredients. Stir in coconut. Pour into a greased and floured 9″x13″ pan. This is a very thick batter, so do not become alarmed. Bake @ 350F for 35-40 minutes or until knife inserted in center comes out clean. Icing: Drain and squeeze most of the liquid out of the pineapple. Beat cream cheese until fluffy, slowly add powdered sugar. Add pineapple. Add to cooled cake. Store in refrigerator.

Savannah is the author of Hammock Tracks. Hammock - an elevated tract of land rising above the general level of a marsh region. Or in other words, where we call home. This is a record of our life, or the “tracks” we leave there. We are the parents of four children. We home school and do other crazy things like raise rabbits, garden, fish, hunt and spend a lot of time together. Just as animals leave tracks in the marsh near our home, we leave tracks here, on Hammock Tracks, for you to read and hopefully enjoy.

Friday, February 10, 2012

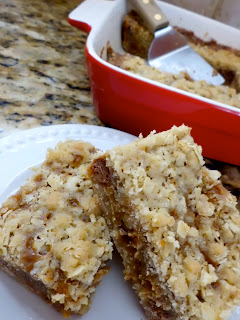
Carmelitas

Hey y'all! It's the mom and sister of the Farm Girl again! We're here to share a recipe with you, we're really excited about this one. [:

Now with the Super Bowl over and Valentine's Day just around the corner you're probably looking for something to make your pants a little more...(for lack of a better word) "happy" with you, right? I know I'm in big need of one of those kinda recipes! Well folks, I'm real sorry but I can't do that for you. I just can't! It wouldn't be morally correct for me to hold out on this recipe. Plus with a batch of these your husband/boyfriend/kids/friends will love you forever! In my personal opinion: a Valentine's day shouldn't pass without a batch of these. Whether you're single or not! This year my man will be 490 miles away and I think I'll just whip up some of these and eat the whole pan with a carton of milk while watching Pride and Prejudice. Sounds lovely doesn't it? I say so.
I found this recipe for Carmelitas on Pinterest and made them the next chance I got. They are so simple, with hardly any hands on time. The hardest part of this recipe is waiting for them to cool! They are really scrumptious warm out of the oven but even better when they've set up. They're worth the wait. Pinky Promise!
Now what are you waiting for?? Go make a pan of em right now! And please try to keep your pants from sending us hate mail. I got enough on my hands from my own!
32 caramel squares, unwrapped
1/2 cup heavy cream
3/4 cup butter, melted
3/4 cup brown sugar, packed
1 cup flour
1 cup rolled oats
1 teaspoon baking soda
6 ounces semisweet chocolate chips

Combine caramels and cream in a small saucepan over low heat. Stir until completely smooth; set aside.

In a separate bowl, combine melted butter, brown sugar, flour, oats, and baking soda. Pat half of the oatmeal mixture into the bottom of an 8x8" pan. Bake at 350 degrees for 10 minutes.

Remove pan from oven and sprinkle chocolate chips over crust. Pour caramel mixture over chocolate chips. Crumble remaining oatmeal mixture over caramel. Return to oven and bake an additional 15-20 minutes, until the edges are lightly browned. Remove from oven and cool completely before cutting.

*A stint in the fridge will help them cool off if you're pinched for time. They shouldn't be served cold, but all of that molten caramel takes a long time to cool down. They should be stored and served at room temperature.
**To make a 9x13" version, simply double the amounts.

Friday, December 16, 2011

Hot Cocoa Dippers...and a Guest Post

See these beauties?

They are little pieces of amazingness.

And perfect on a cold winter night with a mug of hot chocolate.

I am guest posting at Mom's Crazy Cooking and that's where you can find how to make them.

Come see me!!


Wednesday, July 27, 2011

BLT Pizza--Guest Post

 I am so excited to be guest posting over at Alli-n-Son. Go check out this amazing grilled BLT Pizza that I am sharing.

Plus right now I am going to be in the middle of some serious dirt (ie camping, old school style) and wishing I could have one of these babies.

So go stop on by, look at this deliciousness, and let her know where you came.

Monday, May 16, 2011

Cookie Dough Brownies

I know that I have introduced you to my sister before but she is guest posting for me today along with my mom.  Woot!
They are both fabulous bakers, love creating food, and making delicious desserts.  This one is a show stopper everywhere they take it.  
So show them some comment love and make some brownies.

Hey, hey, hey!

This is Emily and Kathy, the Farm Girl's sister and mom, respectively. Raise your hand if you're in love with chocolate chip cookie dough like we are, yep that was everyone.

Now don't worry; according to Facebook so do 331,786 other people. So it's no wonder people can't get enough of these brownies when we make 'em. It's brownies, chocolate chip cookie dough and chocolate, all stacked up on top of each other. Who in their right mind wouldn't salivate at just the thought? The world just became complete in our book. [:

I, Kathy, found the recipe in the Taste of Home magazine and then I, Emily, have been perfecting it ever since. So here's the original if you're interested, or ours goes something like this:

Cookie Dough Brownies


(click here for printable version)

4 eggs
1 cup canola oil
2 cups sugar
2 teaspoons vanilla extract
1-1/2 cups all-purpose flour
1/2 cup baking cocoa
1/2 teaspoon salt
1/2 cup walnuts, optional

Filling:
1/2 cup butter, softened
1/2 cup packed brown sugar
1/4 cup sugar
2 tablespoons milk
1 teaspoon vanilla extract
1 cup all-purpose flour
1/2 cup mini semi-sweet chocolate chips

Glaze:
2 cups milk chocolate chips
2 tablespoons shortening
3/4 cups walnuts, optional

In a large bowl, beat the eggs, oil & sugar. Stir in vanilla. Combine flour, cocoa & salt; gradually add to egg mixture. Stir in walnuts if desired.

Pour into a greased 9 x 13 baking pan. Bake at 350 for 30 minutes or until brownies toothpick test done. Cool completely.

For filling, in a large bowl, cream butter and sugars until light & fluffy. Beat in milk and vanilla. Gradually beat in flour. Stir in mini chocolate chips. Spread over brownies (works best to just press out with clean hands.); chill until firm.

For glaze, in a microwave safe bowl, melt chocolate chips and shortening in 30 second intervals, stirring after each time, until smooth. Spread over filling. Immediately sprinkle with nuts, pressing down slightly. Yields 3 dozen.

*Now, I didn't use any nuts because I find them vomitrotious so I altered the recipe to add the mini chocolate chips to add some texture. So take that into consideration, if you're gonna add the the nuts maybe don't use the mini chips or do! It might be all the more delicious.

The only thing that would make these little ladies better is a big ol' glass of cold milk. Happy baking! [:

Wednesday, February 23, 2011

Guest Blogger: Emily & Molten Lava Cakes

I am so excited to introduce you to my guest blogger today.  Hope you like it and don't forget to show her some love!
Hey there! I'm super excited to be guest posting here at The Farm Girl but there are 2 things you should know first:
 1. This is my first guest post..ever and
 2. I don't exactly know what I'm doing. I guess I should introduce myself.
So ya'll may know me as the girl holding the apples, in a dress and boots at the top of the page, yep that's me. My name is Emily, I'm a freshman minoring in Culinary Arts at BYU-Idaho and am the little sister to the Farm Girl. I was a bit of an odd ball growing up because when other kids were outside making mud pies, I was inside helping my mom make apple pies. In our small, outdated kitchen I learned to love to cook...and eat. [: Now at 19, I'm minoring in Culinary Arts and taking my culinary skills to a whole new level. I've learned how to de-bone a chicken, julienne a carrot and make a white, blond, and brown roux to name a few things.
One really important thing I've learned is that all the skill in the world can't replace a love of cooking and that's why we're all here, scouring recipe books, magazines and blogs for recipes and tips because we love to cook. At least that's why I do. [:
When my sister asked me if I would guest post on her blog while she's off sunbathing on a cruise ship in Mexico (jealous), my mind was instantly set whirling. I thought it would be lovely to share something I learned in class but those recipes are a tad bit extravagant for my limited budget and then cooking for just two (I room with my older sister, party right?) is hard enough as it is. So my search for something affordable, something that doesn't feed an army and something delicious started. I knew these Molten Chocolate Cakes were prefect when I saw them. They'd be the perfect dessert for you and your sweetie on Valentines (sorry it's late but who says you can't have Valentine's day every day??). They are so, so, super easy to make and take literally minutes to whip up. I hope this recipe will bring smiles and good smells to your kitchen or possibly fighting over the last bits of chocolate crumbs like went on in mine. [:

Molten Chocolate Cake

4 Tbsp unsalted butter, plus more for ramekins
1 Tbsp flour, plus more for ramekins
1/3 cup bittersweet chocolate chips
1 large egg plus 1 large egg yolk
2 Tbsp granulated sugar

1. Heat oven at 450 F. Butter two 6-oz ramekins and dust inside with flour
2. Place the butter and chocolate in a glass bowl and microwave in high for 20 second intervals, stirring after each, until melted and smooth.
3. Using an electric mixer, beat the egg, egg yolk and sugar in a medium until thick and lighter in color, about 1 minute. Add the melted chocolate mixture and flour and beat until fully incorporated and smooth.
4. Divide the batter between the prepared ramekins. Bake until edges are set and center jiggles slightly, about 8-10 minutes. Let stand for 15 seconds. Run a knife around the edge, then invert each cake onto a plate. Dust with confectioners sugar and serve with fresh mint, berries, ice cream, whatever you want really. Eat as soon as possible! [:

*Make ahead tip: you can refrigerate the batter in the ramekins for up to one day. Before baking though, bring to room temperature.
However you serve it, be prepared for a whole lot of this!
Lots of love to all!
-Emily from The Ramblings of a Happy Girl.

Wednesday, January 26, 2011

Oreo Brownies & a Guest Post


I am doing a guest post at Sweet Treats today and would love you to come see me!

Plus I am sharing this fabulous recipe!!

It's just one click, so come on over!

Wednesday, November 10, 2010

So Exciting!!

 
Hey I wanted to let you know that I am doing a guest post at U Create Foods today. They are a great, new blog that has some wonderful food ideas and I am so thrilled to be a "creative chef" with them.
Go check me out and let me know what you think!
Blogging tips