Showing posts with label Thanksgiving. Show all posts

Wednesday, November 21, 2012

Cheesy Garlic Rolls

Happy Thanksgiving--tomorrow!

We are in full pie mode at the house.  We have 20 pies to make.  I get so excited just thinking about it.

I have two most favorites foods for Thanksgiving--pies and rolls.  I pretty much like almost every single thing about Thanksgiving dinner (I still can't stand stuffing) but pies and rolls are on the top of the list.

There is nothing like leftover turkey on a homemade roll. I have fond memories of waking up early the day after Thanksgiving to go shopping. We would all grab rolls and turkey and head out the door. I remember it always tasting so good.

This recipe is a ramped up version of your basic roll.  Add lots of delicious cheese and garlic and it is a bite of heaven.  My family went nuts over them and I love how they dress up normal in such a yummy way.

Cheesy Garlic Rolls

(click here for printable version)

Dough:
1 1/2 cup warm water
1 tbsp yeast
1 tbsp sugar
3 1/2-4 cup flour
1/2 tsp salt
1/4 cup butter, melted

Cheese and Herb Topping:
2 cup mozzarella cheese, grated
2 cup cheddar cheese, grated
1 cup parmesan cheese, grated
1 tsp granulated garlic
1/2 tsp oregano
1 tsp italian seasoning
1/2 tsp thyme
 
1. Preheat your oven to 170 degrees F. Mix the water, sugar and yeast together in the bottom of your mixer. Let it sit for 5 minutes. Add the salt and the flour, one cup at a time until dough pulls away from sides and well incorporated. Let knead for 5 minutes and then let dough rest for 5 more minutes.

2. Melt butter and pour half of it into a jelly roll pan or large cookie sheet that has sides. Place dough in the center of the pan. Let it sit 10 minutes. Then roll the dough out flat in the pan until it reaches all of the edges. (Doing all of the spreading and cutting of these rolls, in the pan makes cleaning up your counter so much easier!)

3. Once the dough is spread out, cut in half with a pizza cutter. Pour the rest of the melted butter over each half of the dough and spread it around with your hands so that it evenly covers the dough.

4. In a small bowl combine granulated garlic, oregano, italian seasoning and thyme. Sprinkle the seasonings evenly all over the top of the buttery dough. Sprinkle the shredded cheeses over the top. Roll each dough half up, starring with the long end of each.

5. Using a sharp knife, cut each roll into 12 small pinwheels. Lay each roll flat along the cookie sheet. Put the pan into your warm oven and let the rolls rise for about 5-10 minutes. Turn your oven up to 350 degrees (leaving the rolls inside). Once your oven has reached 350 degrees the rolls should cook for about 10 more minutes, or until the tops and bottoms are golden brown. Remove the pan from the heat and let the rolls rest on the pan for about 5 minutes and then serve.  Enjoy!

Source: Jamie Cooks It Up

Monday, November 19, 2012

Cider Brined Turkey

Do you have your menu planned for the big day?

We get to be with lots of relatives this Thanksgiving which is nice because we spread out the food assignments and no one has to make all of it.

My job this year is the pies.  Surprise, surprise I know.

But I also love to make the turkey.  Mostly because I HATE dry turkey.  I love it moist and juicy so it doesn't have to be slathered in gravy to get it down.

I think one of the biggest keys to a moist turkey is brining it.  There are lots of different ways to brine a turkey.  This recipe was fantastic. The flavor with all the fresh herbs and apple cider was an amazing combination.  The kids thought it was the best turkey we've had so far--which is a ringing endorsement from the non meat lover daughter I have.

Now hopefully the one on Thanksgiving Day will turn out just as good or better!

Cider Brined Turkey

(click here for printable version)

Brine:
8 cups apple cider
2/3 cup kosher salt
2/3 cup sugar
1 tbsp black peppercorns, coarsely crushed
1 tbsp whole allspice, coarsely crushed
8 (1/8-inch-thick) slices peeled fresh ginger
6 whole cloves
2 bay leaves
1 (12-pound) fresh or frozen turkey, thawed
2 oranges, quartered
6 cups ice
Other ingredients:
4 garlic cloves
4 sage leaves
4 thyme sprigs
4 parsley sprigs
1 onion, quartered
1 (14-ounce) can fat-free, less-sodium chicken broth
2 tbsp butter, melted and divided
1 tsp freshly ground black pepper, divided
1/2 tsp salt, divided

1. To prepare brine, combine first 8 ingredients in a large saucepan; bring to a boil. Cook 5 minutes or until sugar and salt dissolve. Cool completely.

2. Remove giblets and neck from turkey. Rinse turkey with cold water; pat dry. Stuff body cavity with orange quarters. Place a turkey-sized oven bag inside a second bag to form a double thickness. Place bags in a large stockpot. Place turkey inside inner bag. Add cider mixture and ice. Secure bags with several twist ties. Refrigerate for 12 to 24 hours, turning occasionally.

3. Preheat oven to 500ºF.  Remove turkey from bags, and discard brine, orange quarters, and bags. Rinse turkey with cold water; pat dry. Lift wing tips up and over back; tuck under turkey. Tie legs together with kitchen string. Place garlic, sage, thyme, parsley, onion, and broth in the bottom of a roasting pan. Place roasting rack in pan. Arrange turkey, breast side down, on roasting rack. Brush turkey back with 1 tbsp butter; sprinkle with 1/2 teaspoon pepper and 1/4 teaspoon salt. Bake at 500º for 30 minutes.

4. Reduce oven temperature to 350ºF. Remove turkey from oven. Carefully turn turkey over (breast side up) using tongs. Brush turkey breast with 1 tablespoon butter; sprinkle with 1/2 teaspoon pepper and 1/4 teaspoon salt. Bake at 350º for 1 hour and 15 minutes or until a thermometer inserted into meaty part of thigh registers 170º (making sure not to touch the bone). (Shield the turkey with foil if it browns too quickly.) Remove turkey from oven; let stand 20 minutes before slicing and serving.  Enjoy!

Source: My Recipes

Friday, November 16, 2012

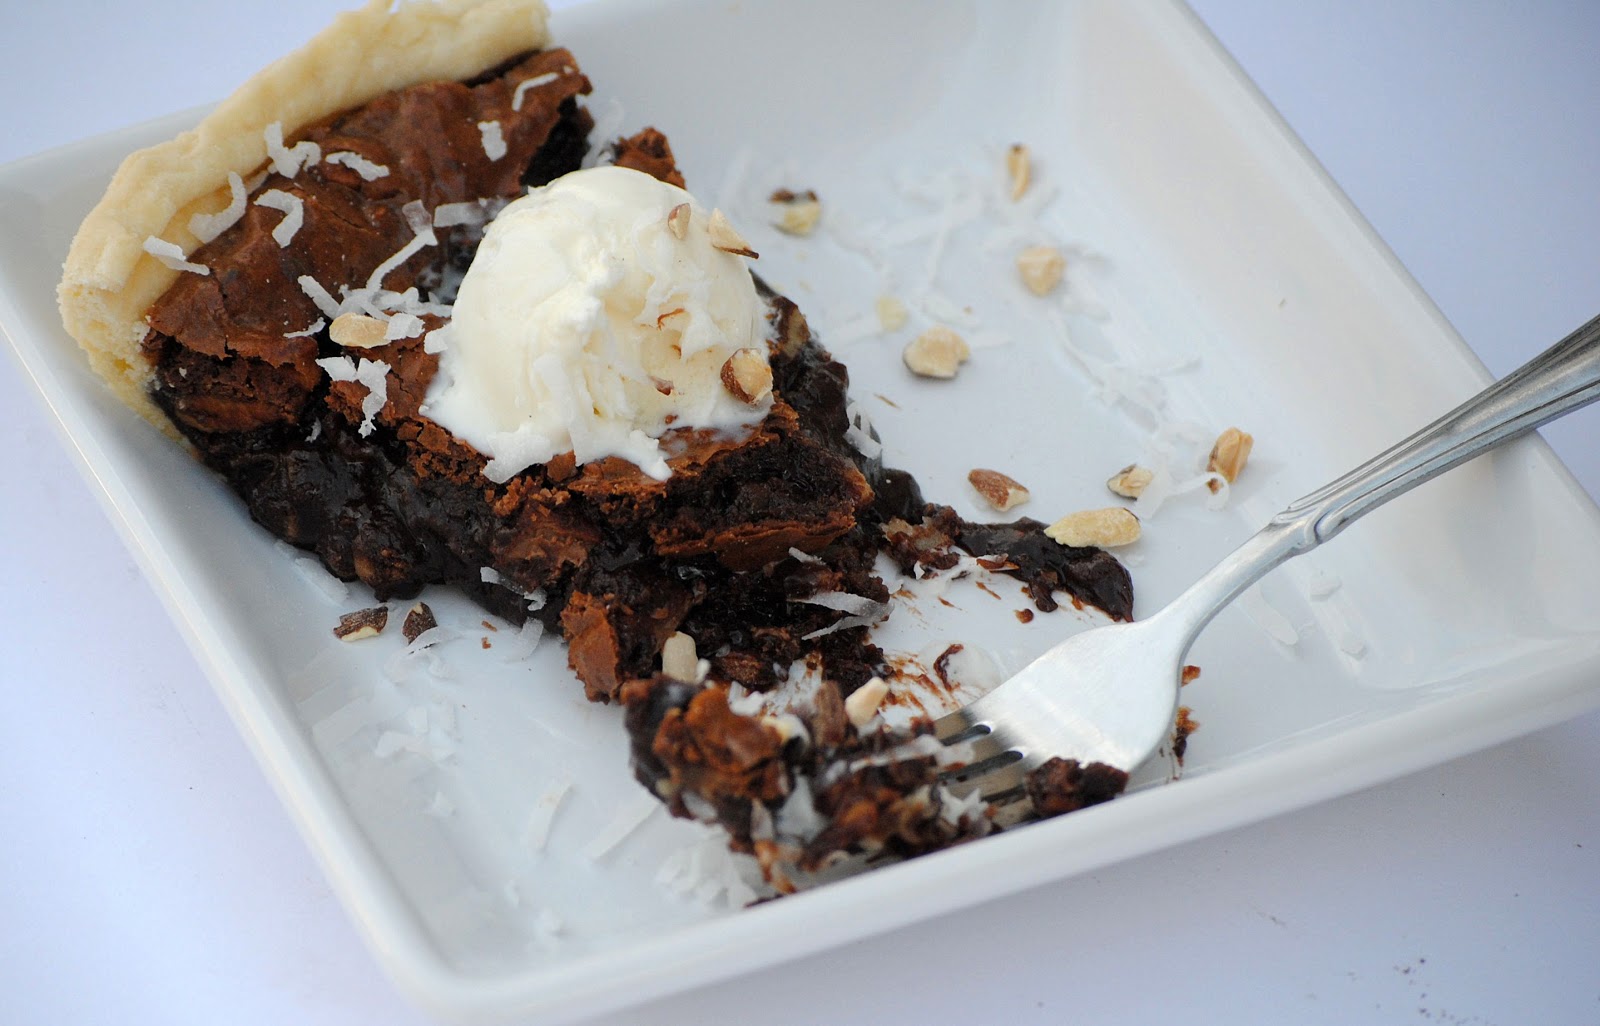
German Chocolate Pie

(Last day to enter the giveaway)

And last but not least...Pie #5.

I shared with you yesterday my love for coconut.  Which is the reason this little pie was put on the short list.  Not only did we combine chocolate and coconut we added nuts.  

Amazing.  

My kids were super disappointed that I didn't make them a pie they could eat.  They hate coconut (and lets not even talk about the nuts) and then when I made that beauty from 2 days ago (the chocolate peanut butter torte), I gave all but one piece away (and the hubs and I ate that piece before they got home from school--I know shame on us :)

I was not their favorite mom that day.  But I have been the hubs favorite all week.  He shares the same love of coconut and nuts as me so this was win-win for both of us (and the neighbors who we shared with too in case you've been thinking we are eating all this pie ourselves!).

This pie was fantastic warm out of the oven with some ice cream.  It's making my mouth water just thinking about it.  Not to mention a super easy pie to throw together.  

Hopefully you have found a new pie to try for Thanksgiving this year, I know we sure have.
 “I’m partying at the Pi Day Pie Party at Crazy for Crust today. Come party with us!”

German Chocolate Pie

(click here for printable version)

1 uncooked pie crust (store bought or homemade)
1/2 cup butter, melted
1 1/4 up. semi-sweet chocolate chips, divided
1/2 cup flour
1/2 cup brown sugar
1/2 cup sugar
2 eggs, beaten
1 tsp vanilla
1 cup chopped pecans
3/4 cup flaked coconut

1. Preheat oven to 350°F. Place uncooked pie crust in pie tin. Set aside.

2. In small bowl, microwave butter until completely melted. Add 1 cup chocolate chips and stir until smooth. Set aside.

3. In separate bowl, stir together flour and sugars. Slowly add chocolate/ butter mixture and stir until blended. Add eggs, one at a time beating well after each one. Add vanilla and stir well. Fold in pecans, coconut, and remaining chocolate chips.

4. Pour mixture into your unbaked pie crust. Bake 35-40 minutes or until top is set and slightly jiggly. DON'T OVER BAKE! Remove from oven and let cool slightly.  Serve warm with ice cream.  Enjoy!

Source: Favorite Family Recipes


Thursday, November 15, 2012

Coconut Key Lime Pie

And up for pie #4...this beauty.

I love coconut.  Always have.  I know for some people it's a take or leave it kinda thing but mine has always been a take it. 

One of my favorite pies ever is this Coconut Cream Pie. My world changed after I tasted it. You know why...2 words...coconut milk.

Man does it make pies taste way better (I mean it totally makes sense since it's the real thing versus the imitation stuff).  When I saw the recipe for this I knew I had to make it.  I mean it calls for coconut milk too.  That sealed the deal for this lady.

This pie was fabulous.  It is very mild on the lime and coconut but a perfect combination.  Top it with toasted coconut and wow!  Absolute deliciousness.
“I’m partying at the Pi Day Pie Party at Crazy for Crust today. Come party with us!”


Coconut Key Lime Pie

(click here for printable version)

1 can (14 ounces) sweetened condensed milk
1 can (13.5 ounces) unsweetened coconut milk
1/3 cup fresh or bottled Key lime juice
7 large egg yolks
1 pre-made graham cracker crust
2 cups cold heavy cream
2 tbsp powdered sugar
3 tbsp sweetened shredded coconut, toasted

1. Preheat oven to 325°F. In a medium bowl, whisk together condensed milk, coconut milk, lime juice, and egg yolks until smooth. Pour into pre-made graham cracker crust and bake until set but still slightly wobbly in center, about 40 minutes. Let cool on a wire rack, 1 1/2 to 2 hours, then refrigerate at least 3 hours (or up to 1 day).

2. When ready to serve, in large bowl, using an electric mixer, beat cream and powdered sugar on high until stiff peaks form, about 3 minutes. Top pie with whipped cream and sprinkle with toasted coconut. Serve and enjoy!

Source: Martha Stewart

Wednesday, November 14, 2012

Chocolate Peanut Butter Torte

(Don't forget to enter my latest giveaway)

I think I have found heaven. Pie #3.

I'm totally not joking.

I am at a loss of words because this torte was one of the most delicious things I have every tasted.  I have tasted some pretty amazing things, but this takes it all.
I will let the pictures speak for themselves because I really don't know what to say besides, "Amazing", "To Die For", "You need to make it RIGHT now!", "Delicious".

Chocolate Peanut Butter Torte

(click here for printable version)
Crust:
32 Oreo cookies, finely processed into crumbs
5 1/3 tbsp butter, melted and cooled
Small pinch of salt

Crunch:
1/2 cup salted peanuts, finely chopped
1/2 cup mini chocolate chips
2 tsp sugar
1/4 tsp ground cinnamon
Dash of ground nutmeg

Filling:
2 cups heavy cream
1 1/2 cups powdered sugar, sifted
12 oz. cream cheese, at room temperature
1 1/2 cups creamy peanut butter (not natural)
2 tbsp whole milk
1/4 cup salted peanuts, finely chopped

Topping:
1/2 cup heavy cream
4 oz. bittersweet chocolate, finely chopped
1/2 cup  salted peanuts, finely chopped

1. To make the crust, preheat the oven to 350° F. Butter a 9-inch springform pan and place it on a baking sheet. Combine the Oreo crumbs, melted butter and salt in a small bowl. Toss with a fork to moisten all of the crumbs. Press into a thin layer covering the bottom and sides of the springform pan. Freeze the crust for 10 minutes. Bake in the preheated oven for 10 minutes, then transfer to a wire rack and cool completely before filling.

2. To make the crunch, in another small bowl combine the 1/2 cup chopped peanuts, mini chocolate chips, sugar, cinnamon and nutmeg. Toss with a fork to mix and set aside.

3. To prepare the filling, in the bowl of a stand mixer fitted with the whisk attachment, whip 2 cups of the cream until it holds medium peaks. Beat in 1/4 cup powdered sugar and whip until the cream holds medium-firm peaks. Scrape the cream into a separate bowl and refrigerate until needed.

4. Wipe out, but do not wash the mixer bowl, replace the whisk with the paddle attachment, and beat the cream cheese with the remaining 1 cup powdered sugar on medium speed until the cream cheese is completely smooth. Beat in peanut butter, whole milk, and 1/4 cup chopped peanuts until well combined.

5. Using a large rubber spatula, gently stir in about 1/4 of the whipped cream just to lighten the mousse. Still working with the spatula, stir in the crunchy peanut mixture, then carefully fold in the remaining whipped cream. Scrape the mousse into the crust, mounding and smoothing the top. Refrigerate for at least 4 hours or overnight; cover with plastic wrap as soon as the mousse firms.

6. To finish the torte, put the chopped chocolate in a heatproof bowl set over a saucepan of simmering water. Leave the bowl over the water just until the chocolate softens and starts to melt, about 3 minutes; remove the bowl from the saucepan. Bring the 1/2 cup of cream to a full boil. Pour the cream over the chocolate and, using a rubber spatula, very gently stir together until the ganache is completely blended and smooth.

7. Pour the ganache over the torte, smoothing with a metal icing spatula. Scatter the peanuts over the top and chill to set the topping, at least 20 minutes. When the ganache is firm, remove the sides of the springform pan. Refrigerate until ready to serve. Enjoy!

Source: Annie's Eats

Tuesday, November 13, 2012

Momofuku's Crack Pie

Welcome to Pie Day #2.  Up on the menu...Crack Pie.

I know right?   

Yep.

I have been wanting to try this baby for a year now because of it's unique name and because it sells for $44 a pie at the Momofuku Milk Bakery and Milk Bar in Manhatten.  And they sell 60-90 a day.  Crazy! Any pie that costs that much, I had better try.

And just in case your wondering (I looked it up because I wondered too) how it got it's name.  This was pie is so addicting--it's all the butter, sugar, and cream--that they named it after the drug.  

And no there are no drugs in here, just proven amazing ingredients.  Seriously, mix that much deliciousness together and you have one addictive little pie.
Remember I’m joining TidyMom and Whirlpool for the 4th Annual Love the Pie Party. Enter a pie to win a new Whirlpool Gold® Induction Range.

Momofuku's Crack Pie

(click here for printable version)


Makes 2 10 inch pies.

Cookie for crust:
2/3  cup plus 1 tbsp all purpose flour
Scant 1/8 tsp baking powder
Scant 1/8 tsp baking soda
1/4 tsp salt
1/2 cup butter, softened
1/3 cup firmly packed light brown sugar
3 tbsp sugar
1 egg
scant 1 cup old fashioned oatmeal, uncooked

Crust:
Crumbled cookie for crust (see above)
1/4 cup butter
1 1/2 tbsp firmly packed brown sugar
1/8 tsp salt


Filling:
1 1/2 cup granulated sugar
3/4 cup plus a scant 3 tbsp firmly packed light brown sugar
1/4 tsp salt
1/3 cup plus 1 tsp powdered milk
1 cup butter, melted
3/4 cup plus a scant 2 tbsp whipping cream
1 tsp vanilla
8 egg yolks
2 prepared crusts (see above)
powdered sugar for garnish.


1.  Preheat oven to 375°F. Spray a 9x13 pan with non-stick cooking spray.  Set aside.

2.  To make the cookie, in a medium bowl, sift together the flour, baking powder, baking soda and salt (and yes you will want to sift it).

3. In your mixer using the paddle attachment beat the butter, brown sugar and sugar until light and fluffy, about 2-3 minutes.  Whisk the egg into the butter mixture until fluffy and incorporated.  With the mixture running, beat in the flour mixture a little at a time until totally combined.  Stir in the oatmeal until well incorporated. Spread the mixture into your pre-pared pan and bake until golden brown and set, about 18-20 minutes.  Remove from oven and cool on rack.  Crumble the cooked cookie to use in the crust when it has cooled completely.

4.  To make the crust, combine the crumbled cookie, butter, brown sugar and salt in a food processor and pulse until evenly combined and blended (you will know you have the right consistency when a little of the mixture will clump together between your fingers and hold together).  Divide the crust between your two 10 inch pie pans.  Press the crust into each shell to form a thin even layer along the bottom and sides of the tins.

5. To make the filling, preheat oven to 350°F.  In a large bowl, whisk together the sugar, brown sugar, salt and powdered milk.  Whisk in the melted butter then whisk in the cream and vanilla.  Gently whisk in the egg yolks, being careful not to add too much air.

6. Divide the filling evenly between the 2 pie shells.  Bake the pies one at a time for 15 minutes, then reduce the heat to 325 degrees and bake until the filling is slightly jiggly and golden brown (the center will seem very jiggly and not done but take out anyway) about 10-15 minutes. Remove pie from oven and cool on rack.  Refrigerate the cooled pies until well chilled.  Dust with powdered sugar right before serving.  Enjoy!

Source: Homebased Mom

Monday, November 12, 2012

Apple Crumb Pie and a GIVEAWAY!!

 Welcome to PIE WEEK.

 I’m joining TidyMom and Whirlpool for the 4th Annual Love the Pie Party. You can too. Enter a pie to win a new Whirlpool Gold® Induction Range.

I decided that since pies are my favorite part of Thanksgiving I would devote an entire week to them.  I always have a list of new pies I want to try and now is a perfect time to share my favorites.

I LOVE apple pies.  And I love to try to new ways to eat them.  I have seen several recipes floating around with crumb toppings and finally decided on this beauty.  I love the crunchiness the crumb topping gives it, which pairs perfectly with the soft apples.  Definitely an add on to your Thanksgiving menu.

And to kick off PIE WEEK I am doing a giveaway.

Have you ever heard of FLIPZLES.
My sister introduced me to them and they are fabulous.  "They are a two sided, wooden children's puzzle. The house puzzle has 23 wooden pieces is printed on both sides. The front shows pieces of the exterior of the house while the flip sides are pieces of a house play set. The pieces stand alone and include members of the family - from grandma to baby, pets, furniture and household objects. There is even a rocking horse that really rocks! It also comes in a zip-and-take carrying case that keeps the pieces together and makes storage and travel convenient."
(taken from Flipzles.com)
My kids love puzzles and this is a perfect gift for a child in your family.  Vicki (the creator--who does all the work behind Flipzles from the painting to designing to manufacturing and is a stay-at-home  mom on top of it all) is going to giveaway 1 free house flipzle to one of my readers.

Mandatory entry: visit the Flipzle's website and tell me which flipzle is your favorite.

Extra entries:
1.  Follow me on GFC (if you already do, just let me know)
2. Like my FB page (if you already do, just let me know)
3. Like the Flipzle FB page.
4. FB, blog, or tweet about this giveaway (please leave the link so I can check it out).

Please leave a separate comment for each entry.

Giveaway ends November 16th at midnight (MST) and winner will be chosen via random.org.  Giveaway open to all US residents.

Now onto the pie.

Apple Crumb Pie

(click here for printable version)

Topping:
1/2 cup flour
1/3 cup packed brown sugar
1 tsp cinnamon
1/4 tsp salt
5 tbsp cold butter, cut into chunks

Crust:
1 1/3 cups flour
1/8 tsp salt
1/2 cup cold butter, cut into chunks
4-5 tbsp ice water

Filling:
7 large apples, peeled, cored, and diced
1 tbsp fresh lemon juice
1/3 cup granulated sugar
2 tbsp cornstarch
1 tsp cinnamon
1/2 tsp nutmeg
1/4 tsp ground cloves
pinch of salt

1.  Preheat the oven to 375°F. Spray a 9 inch pie with non stick cooking spray and set aside.

2. To make the topping, combine flour, brown sugar, cinnamon, and salt in a medium bowl. Add butter and use a pastry blender to cut the butter into the flour mixture until it is crumbly. Cover and refrigerate until ready to use.

3. To make the crust, pulse flour and salt in the bowl of a food processor until combined (you can do this with a pastry blender and a bowl but the food processor makes it so much easier and a nicer crust). Add butter chunks and pulse just until butter is in pea-sized clumps. Slowly add cold water and run food processor just until dough comes together in one ball. Place dough on a well-floured surface and roll into a large circle, big enough to fit your pie pan. Gently lift dough and place in your prepared pie pan. Carefully press the dough into the bottom and up the sides of the pan. Fold any dough that hangs over the edge under itself and crimp however you would like it.

4. To make the filling, combine all ingredients in a large bowl and toss to coat. Spoon filling into prepared crust, top with crumb topping, and place on a foil-lined baking sheet. Bake for 50-60 minutes and the whole pie is golden brown. Remove pie from oven and allow to cool 10-15 minutes before slicing. Serve with vanilla ice cream. Enjoy!

Source: Lulu the Baker

Wednesday, November 23, 2011

Good Luck Potatoes

Happy Thanksgiving...tomorrow!

Are you ready?

I'm not but I'll get there eventually.

I am in charge this year of the regular potatoes, the sweet potatoes, a fruity-type salad, and a couple pies.  I plan my meal for at least a month in advance so I can make sure we have the most delicious items and well lets face it, I love an excuse to try out even more recipes.

I definitely know what pies I am taking...Coconut Cream and Apple (the hubs requested this one) and and what sweet potato dish is going but we weren't quite set on which potatoes to bring.  So in our quest for the perfect potatoes for wowing the family we came across this beauty.

I just have one word to say about it.

Gruyere.

Okay maybe two words.

Amazing.

Donna's Good Luck Potatoes


3 pounds russet potatoes
3 ounces grated Gruyere cheese 
¼ c. butter, melted 
½ c. milk
¾ c. whipping cream
3 Tbsp. shredded Parmesan cheese, fresh is best

1.  Scrub the potatoes and poke several holes in each with a fork. Bake the potatoes at 400 degrees for 45-60 minutes, or until a fork pierced into one of the thicker ones goes in easily. Remove from oven and cool potatoes briefly. 

2.  Cut each potato in half, and using a towel in your hand to keep the potatoes from burning you, spoon the flesh from the peels. Put the potato flesh in a large bowl and discard the peels. Mash the potatoes a few times with a masher and add the melted butter. Continue to mash the potatoes until they are evenly coated with butter. (note: It is very important to make sure the better is completely absorbed into the potatoes before you add the milk) Add the milk and continue to mash until the potatoes are the consistency that you like.  Add salt and pepper to taste. 

3.  Spread the potatoes into a greased 3 quart baking dish.  Cover them and put them in the oven at 250°F while you prepare the topping. 

4.  Whip the cream until it is fluffy, but soft and fold in Gruyere cheese. Remove potatoes from the oven and spread the cream mixture over the potatoes and sprinkle Parmesan cheese on top. Bake at 500 degrees for 10 minutes.  Enjoy!


Monday, November 21, 2011

Chocolate Covered Pretzel Pie

I think pies are the culmination of Thanksgiving and they are what I devote most of my time to.

I love pies and will always pick them over cake.  

Growing up, the only kind of cake I would ever have for my birthday was Strawberry Shortcake but I usually picked some kind of pie.

I don't know what it is about pie but it speaks to me.  It speaks to my stomach, my mouth, and to my brain, saying "you are amazing".  I think it's because there are so many different kinds of pie.  There are yummy chocolate pies, there are fruit pies, their are nutty pies, there are vegetable pies (ie; pumpkin), and you can have them with all sorts of crusts--pretzel, regular, graham crackers, pastry, etc.  

See what I mean--so many ways to eat this deliciousness and why limit yourself to 2 months of the year.  I make them all year round and I love it.

This pie met all my expectations of pie-ness.  Decadent and filled with chocolate goodness.  This would be amazing on your Thanksgiving table and I'm sorry if you eat 5 pieces of it (because you just might!).
Note:  Use the best chocolate you can find.  It will make a difference in your pie.

Chocolate Covered Pretzel Pie


3 cups (about 4 oz) broken pretzel sticks
3/4 cup light brown sugar, divided and lightly packed
1/2 cup butter, melted
1/4 cup cornstarch
3 Tbsp. unsweetened cocoa
Pinch of salt
2 1/2 cups whole milk 
4 egg yolks
3 ounces bittersweet chocolate, chopped
4 ounces semi sweet chocolate, chopped
1-1/4 cups + 2 Tbsp. heavy whipping cream, divided
1 tsp. vanilla extract
2 Tbsp. confectioners sugar

1.  Heat oven to 350°F. In a food processor combine pretzels, 1/4 cup brown sugar, and melted butter. Blend until mixture resembles fine crumbs. Press mixture firmly into bottom and up sides of a 9-inch pie pan. Bake crust until fragrant and just turning golden, about15 minutes. Cool completely.

2.  In a medium saucepan whisk together 1/2 cup lightly packed brown sugar, cornstarch, cocoa, salt, and milk.  Place over medium heat and stir until sugar is just dissolved, about 2 minutes.  Whisk in egg yolks.  Cook, stirring constantly, until custard thickens and just boils, about 5 minutes. Remove from heat and stir in bittersweet chocolate and vanilla.  Place pan in a bowl of ice and water and stir occasionally until custard cools to room temperature.

3.  While custard cools, make a chocolate ganache to cover pie crust. Place chopped semi sweet chocolate in medium bowl. Heat 1/4 cup + 2 tablespoons of heavy whipping cream in microwave about 30-40 seconds, just until it boils.  Pour warm cream over chocolate and stir until melted.  Pour over cooled pie crust, using rubber spatula to help spread chocolate up the sides and over entire bottom of crust. Place in refrigerator or freezer until set. 

4.  Pour custard into cooled crust with hardened ganache and press plastic wrap directly onto surface. Chill until firm, 4 hours or up to a day.

5.  Right before you are ready to serve, whip cream and confectioners’ sugar until soft peaks form, spread over pie and garnish with extra pretzels and chocolate shavings.  Enjoy!

Source: Tidy Mom

Friday, November 18, 2011

Caramel Pumpkin Pie

Sometimes I'm a blond.  I try really hard not to be.  I was born as a blond but the older I get the darker my hair is and the more serious people think I am.

I try to keep up that persona but sometimes it gets the better of me.  Like yesterday.  I was at the gym (yes I go to the gym, it's the only way I can eat stuff like this and not gain 20 lbs!) and the instructor said, "Hope you have a great Thanksgiving next week."

Me, thinking I'm so smart, says, "Oh that's funny Thanksgiving is not next week."

And the instructor kindly says, "Yes it is next week" with a very funny look on her face.

S.E.R.I.O.U.S.L.Y.

Where have I been?

So in honor of Thanksgiving next week here is a pie that we loved.  The caramel is fantastic with the pumpkin.  It is perfect combination and my kids asked for thirds it was that good.

Caramel Pumpkin Pie


Crust:
1 package cinnamon graham crackers (about 9)
1/3 c. butter, melted
Filling:
3 large eggs
1 c. heavy cream
One 15-ounce can unsweetened pumpkin puree
1/2 c. brown sugar
1 tsp. cinnamon
1/4 tsp. cloves
1/4 tsp. nutmeg
1/2 teaspoon salt
Caramel Whip Cream:
28 caramels, unwrapped
1 3/4 c. heavy cream, divided

1 ounce bittersweet chocolate, for grating

1. Preheat oven to 350° F.  Crush graham crackers until they are all fine crumbs (I use my food processor and it works great).  Put in your pie pan and mix with butter until well combined. Press the mixture onto the bottom and up the sides of a 9-inch deep-dish pie pan. Bake for 10 minutes; let cool completely.

2. Meanwhile in a large bowl, whisk together the 3 eggs, 1 cup cream, pumpkin, brown sugar, spices and salt until just combined. Pour into the cooled pie shell and bake until set, 40 to 45 minutes. When you shake the pan, the filling should no longer be jiggly. Let the pie cool at room temperature slightly, then refrigerate for at least 3 hours, or overnight.

3. In a bowl, microwave the caramels with 1/2 cup cream until melted, 2 to 3 minutes- adding 1 minute increments, if needed, if they are still not completely melted. Stir until smooth, then let cool to room temperature.

4. Using an electric mixer, whip the remaining 1 1/4 cups cream until soft peaks form. Drizzle in the cooled caramel and beat until well blended. Spoon the caramel whipped cream on top of the pumpkin filling and refrigerate until completely chilled. Before serving, coarsely grate the chocolate on top of the pie and drizzle with more caramel.  Enjoy!

Source: slightly adapted from Recipe Girl

Wednesday, November 9, 2011

Cheesy Au Gratin Potatoes

Most of us are potato lovers at our house, especially the hubs.  If I ever ask him what he wants with the main dish it's always potatoes.  I try to get him to branch out and sometimes he does but it's only as far as rice.

I know, not very exciting.

But because we have potatoes so often I am always looking for new ways to have them.  I can only handle so many baked, mashed, and roasted potatoes and then I have to find something different.

Well I have stumbled upon two AMAZING new potatoes recipes that would be perfect for Thanksgiving and so delicious for any time of the year.

The first one is this lovely lady (and the next one I will share next week).  These are now my go to recipe.  The whole family L.O.V.E.S. them.  It is good that it makes a small pan because you could seriously eat the whole thing...not speaking from experience or anything!

It is also ideal for gatherings.  I have taken this deliciousness to two get togethers recently and everyone has ranted and raved over it. I love the crunchy topping but feel free to leave it also and I love that their is not one can of creamed anything in this recipe!

Cheesy Au Gratin Potatoes


Potatoes:
3 Tbsp. butter
1 small yellow onion, chopped
1/4 c. all-purpose flour
1 1/2 c. low-sodium chicken broth
1 c. milk
1 ½ tsp. salt
1/2 tsp. pepper
1/2 tsp. dried thyme
2 c. shredded sharp cheddar cheese (about 8 ounces)
26-ounce bag frozen shredded hash browns
1/2 c. light sour cream
Topping:
3 c. cornflakes, lightly crushed
2 Tbsp. butter, melted

1.  Preheat oven to 350° F.  Melt butter in a large pot over medium heat. Add onion and cook until the onion is softened and translucent, about 5-6 minutes. Stir in the flour and cook, stirring constantly, for about a minute. Combine the chicken broth and milk in a liquid measure and slowly whisk in the mixture. Add the salt, pepper and thyme. Stir to combine. Bring the mixture to a boil and then reduce the heat to medium-low and simmer, stirring frequently, until the mixture is slightly thickened, about 5 minutes.

2.  Take the pot off the heat and stir in the cheese until smooth. Mix in the frozen hash browns, lifting and folding the mixture until well combined. Finally, stir in the sour cream.

3.  In a medium bowl, toss the lightly crushed cornflakes with the butter until evenly combined. Put the potato mixture into a 9X13-inch baking dish and top with the buttered cornflakes. Bake for 45 minutes, or until hot and bubbly around the edges. (If you would like these to cook longer you can also cook them at 300° F for 90 minutes) Remove from oven and let rest for 10 minutes before serving.  Enjoy!


Wednesday, November 2, 2011

Simple Thanksgiving Dinner

Can you believe it's November!!??!!  I shared this post last year on a blog and thought you might enjoy it here too.

We're getting ready for Thanksgiving, and as part of my ritual I have gone looking around for recipes, and couldn't help but notice that most recipes are very time-intensive—not very practical for some of us that are chasing kids or working long hours right up until the big day. I wanted to get back to the basics with Thanksgiving, especially for those of you that may be running the show for the first time.

There are 4 necessities for a traditional Thanksgiving dinner: turkey, potatoes, rolls and pies. The rest is just icing on the cake.

The Turkey
Naturally, the turkey is the most important part of the meal.  If you mess it up, no one will forget it (remember Aunt Bertha's Turkey Jerky from 1964?).  If the turkey's perfect, everyone will be sleeping peacefully within an hour or so--more pie for you!  There are 3 commandments when it comes to making the perfect turkey.  First:  Thou Shalt Brine Thy Turkey.  This one step can mean the difference between  turkey that requires lubricant to swallow (typically gravy), and turkey that stands firmly on its own delectable thighs.  Second:  Thou Shalt Cook Thy Turkey Breasts Down.  This allows the moisture to flow down into the meaty parts of your turkey--the parts that will actually get eaten.  Third, Thou Shalt Use a Meat Thermometer.  Don't rely on the little pop-out thing that comes with most turkeys.  By the time that thing pops out, your turkey will most likely be jerky.

1.  Three to Four Days Prior:  If you're like most of us and are using a frozen turkey, move your turkey to the refrigerator three to four days before Turkey Day.

2.  The night before Turkey Day, assemble your brining ingredients.  There are several varieties, but the one I like the most combines water with salt, sugar, fresh thyme and fresh rosemary.  That's the one I've used below.  Other variations include adding acidic fruits (lemons/oranges), and just about any other spice you can think of.

3.  For the brine, I do a 1/2-1-1 ratio, meaning 1/2 c. sugar to 1 c. salt to 1 gallon of water.  I typically start with 2 gallons of water.  In a saucepan combine the salt, sugar and about four cups of the water.  Over medium heat, stir gradually until the sugar and salt have completely dissolved.  Put this mixture aside to cool.
  
4.  Remove the gizzards bag from inside the turkey and rinse the turkey with cool water.  Place the turkey in a large (preferably 5-gallon), clean bucket with 6-7 sprigs each of fresh thyme and fresh rosemary.  Pour your cooled mixture (from step 3) over the top of the turkey.  Add enough cold water to cover the turkey completely.  Cover your bucket with tin foil or a lid, and put it in a cold (but not freezing) place.  If you have space in the refrigerator, that's probably best, but I've put mine outside if its cold enough.  Remember you only want to leave the turkey in the brine for 1 hour per pound of turkey.  If you leave it too long, you may end up with turkey soup.

5.  When you are ready to cook, remove the turkey from the brine and rinse it thoroughly.  Discard the brine.  Place the turkey on a clean surface and towel dry the turkey, inside and out.  Place turkey in a roasting pan.  I use a separate electric roasting oven to preserve oven space.

6.  Assemble your ingredients for the inside of the turkey.  This recipe does not incorporate breaded stuffing because I hate it (no offense to you stuffing lovers).  

Butter, softened
2 carrots (washed and chopped in 1 inch pieces)
2 stalks celery (washed and chopped in 1 inch pieces)
1 onion (chopped in large pieces)
2 sprigs fresh Rosemary (or 1 T. dried)
2 sprigs fresh Thyme (or 1 T. dried)
Pepper, to taste

7. Using your hand, spread butter all over the skin of the turkey and underneath the skin, especially on the breasts.  Sprinkle pepper all over turkey.  Place all the carrots, celery, onions, and fresh rosemary and thyme in cavity of turkey.  Tie the legs shut with cooking string--this helps keep all that goodness in the middle, and place the turkey--breasts down--in the roasting pan.  Insert meat thermometer in the thigh.  Make sure the thermometer is not resting against a bone but is lodged firmly in the thickest portion of the thigh.

8.  Cook at 450 degrees for ½ hour, then turn down the temperature to 325.  Depending on the size of your turkey, it should take 2 ½-3 hours for an 8-12 pound turkey or 3-3 ½ hours for a 12-16 pound turkey.  If using a meat thermometer, the thigh should register 175 degrees when the turkey is done.  Turn off the oven, and and let the turkey sit 20 minutes in the covered pan before carving.  Enjoy!

The Potatoes

We love potatoes at our house, especially topped with gravy made from turkey drippings.  Potatoes can be simple, mashed with a little bit of butter, salt and sour cream, or more complex (at least for potatoes).  Plus I'm from Idaho, so potato promotion is good for the economy!    
A lot of Thanksgiving is about thinking ahead: planning out exactly what you are going to make, how long it needs to cook, what oven space you will need, etc.  Potatoes are one thing that you can totally do the day before, stick in the fridge, and then heat up when you are ready.  One of my favorite recipes is called Creamy Mashed Potatoes and comes from Pioneer Woman.  They are very delicious and heat up beautifully the next day.

Rolls
One of my very favorite things about Thanksgiving is the leftover turkey and rolls.  Mmmm...it makes my mouth water just thinking about it.  Unfortunately, making yeast breads is more like a relationship than a recipe--you're never going to get it just right the first time, and probably not even the tenth time, and you won't know if the recipe you're working with is any good until you've made it several times and had a chance to iron out the kinks.
  This is something that I have been working on since I was about 8 years old.  My grandmother and mother would let me work with the dough when they made bread so I could learn how it should feel and what it should look like.  Now I can tell just from touch if it's going to turn out well.  If you have never made rolls before, I wouldn't try them out for the first time at your special dinner.  Either practice beforehand with your recipe several times until you get it right, or buy them.  There is nothing wrong with store-bought rolls--especially if you have a local bakery that you trust and you can get them somewhat fresh.  Plus if they're not that good you can save face by blaming it on the store where you bought them.  
Yeast breads are much easier if you have a bread machine (hence the name).  However, often I find that bread from a breadmaker is too airy, and the flavor is shallow.  If you've ever had a really good artisan bread then you know what I'm talking about.  I like my bread with a little more substance, so I use a Bosch mixer (my machine of choice).  I love the dough hook, and it will make your attempts at bread-making much better because the dough will always pull completely away from the sides of the bowl when you have added enough flour.  
I have some tried and true roll recipes on my blog, but if it's too late this year maybe you can start working with a good recipe now and be ready to have awesome rolls by next Thanksgiving.  My two favorite recipes are Garlic Knots and Fancy Dinner Rolls.  I've tried several other recipes, but take it from me that these two recipes in particular are worth getting into a committed relationship with.  

Pies


I know there are some people, including my sister, who don't like pies, but great pies are what most of my family looks forward to as much as the turkey.  Pies are something that you can also keep very simple.  Some of my family's favorites from growing up are the simplest.  My dad loved mincemeat pie, but I think that was mainly because he didn't have to share it because no one else would eat it.  
Pie filling is often a fairly simple matter.  When it comes to crust, however, all too often a soggy and/or tasteless pie crust can ruin an otherwise excellent pie.  I think sometimes people forget that the pie crust is supposed to do more than just contain the filling--it is supposed to be edible, and should complement the filling in both texture and flavor.  I looked for awhile and finally found a flaky, buttery pie crust recipe with a great texture AND taste that complements just about any pie filling!  Check it out here.
A pie crust is also something you can make ahead of time.  If you are going to use a crust for pudding pie, cook the crust beforehand (10-12 minutes at 400 degrees) and store it covered in a cool place until you are ready.  Here are two easy pudding pie recipes that are sure to be a hit with your crowd.  

Chocolate Pudding Pie

1 9-inch pie crust, pre-cooked and cooled
1 small box (3.4 oz) instant chocolate pudding
1 ½ c. milk
8 oz cool whip
Cocoa (for spinkling on top)

1. Mix chocolate pudding with milk and whisk for 1 minute.  Let set up for 5 minutes.  Fold in cool whip and store covered in the refrigerator until ready to serve.
2. When ready to serve, pour into your pie crust.  Sprinkle cocoa on top and serve immediately.

Banana Cream Pie

1 9-inch pie crust, pre-cooked and cooled
1 small box (3.4 oz) instant vanilla pudding
1 1/2 c. milk
3-4 bananas
8 oz. cool whip

1.  Mix vanilla pudding and milk together, whisking for 1 minute.  Let sit 5 minutes until set.  Slice bananas into 1/4" pieces and add to the pudding mixture.  Fold in cool whip.  Store covered in refrigerator until ready to serve.
2.  When ready to serve, pour into your pie crust and serve immediately.

I hope this helps with your Thanksgiving preparations!

Thursday, November 11, 2010

Apple Buttery Pear Pie

Do you know what kind of pies you are making for Thanksgiving--or eating?  This is a new one for my family but it is definitely on our list.  I made this for some friends and it was gone within 5 minutes.  It is that good!  The apples and pears go so well together and compliment each other perfectly.


3/4 c. sugar
6 T. all-purpose flour
1/2 t. cinnamon
1/4 t. cloves
1/2 c. apple butter (I used regular butter and it turned out great)
2 T. lemon juice
6 c. peeled, cored, and thinly sliced Granny Smith apples
2 c. peeled, cored, and thinly sliced Bartlett pears
2 T. butter, cut into small pieces
2 pie crusts ( I use this one, but you can also buy refrigerated ones)
1 egg yolk
2 T. milk
Sugar
Whipped cream, optional
Ice cream, optional

1.  Preheat oven to 350 degrees.  Line a rimmed cookie sheet with tin foil and spray with non-stick cooking spray.  In a large bowl, whisk together sugar, flour, cinnamon, and cloves.  Whisk in apple butter ( or softened butter) and lemon juice until smooth.  Stir in apples, pears, and 2 T. butter.  Spoon mixture on prepared cookie sheet in an even layer.  Cover with more tin foil and bake for 25 minutes or until apples and pears are tender.  Uncover and bake for 10 more minutes, stirring twice.

2.  On a lightly floured surface, roll out 1 pie crust into a 12 inch circle.  Place in the bottom of 9-inch deep dish pie plate.  Trim excess pastry 1/2 inch beyond pie plate.  Spoon cooked apple mixture into prepared crust.

3.  Roll out another pie crust into a 12-inch circle.  Cover apple mixture with prepared dough, pressing crusts together around the rim.  Trim excess dough.  Pinch dough between thumb and forefinger to achieve a wavy edge.  

4.  In a small bowl, whisk together egg yolk and milk.  Brush top of crust with egg mixture.  Sprinkle with sugar.  Cut slits in the top of crust for steam to escape.  Bake for 30 minutes or until pie is golden and juices are thickened.  Remove and serve with whipped cream or ice cream.

Source:  Paula Deen

Sharing this with: Finger prints on the fridge, Sugar Bananas, Frou Frou Decor, DIY Showoff, Katie's Cucina, Tatertots and Jello, Be Different Act Normal, Quit Eating Out, The Girl Creative, Tidy Mom.

Tuesday, November 24, 2009

Citrus Brined Turkey


Have you ever brined your turkey?  We started cooking our turkey this way several years ago and I will not go back.  It makes the turkey so moist and adds the most wonderful flavor.  There are many different kinds of brine recipes but here is one that we have loved.

1 1/2 c. salt (kosher salt works the best)
2 lemon, cut into wedges
2 orange, cut into wedges
1 large onion, cut into wedges
6 cloves garlic
4 bay leaves
2 tablespoon dried thyme
1 tablespoon whole peppercorns
2 sprigs fresh rosemary
1/2 c. brown sugar
1 1/2 gallons cold water

* In large stockpot, mix 1/2 of water with the rest of the ingredients.  Heat until brown sugar dissolves. Add rest of water and cool to room temperature.   In large clean pot or bucket put turkey and cover (if water doesn't cover add more cold water).  Refrigerate overnight. When ready to cook, place turkey in roasting pan.  Put oranges, lemons and rosemary from brine in the cavity.  (Try to do this part as quickly as possible because the brine will leave the meat very quickly). Place thermometer in thigh.  Discard the rest of the brine. Cook until thermometer reaches 180 F. Take out of oven, let rest 10 minutes and serve.

Monday, November 23, 2009

Homemade Cranberry Sauce


(thanks Naturipe for the photo)


Have you ever made cranberry sauce?  Well if you like whole cranberry sauce then you need to try this.  I loved it way better than the can (sorry Oceanspray) and so yummy with the turkey.

1 c. water
1 c. sugar
1 12oz. package cranberries
3 T. cornstarch
2 T. water

* Combine water and sugar in medium saucepan and bring to a boil.  Stir in cranberries.  Return to boiling.  Let simmer gently for 10 minutes, stirring occasionally.  Mix cornstarch with water until smooth and add to cranberries.  Stir until well mixed.  Cool to room temperature.  Cover and refrigerate until serving time.  Enjoy!
Blogging tips