Showing posts with label Appetizers. Show all posts

Friday, March 15, 2013

Hot Pizza Dip Bites

We are starting to warm up around here so I thought I better share some recipes that need the oven before we move into the the "it's too hot and i'm not turning on the oven" phase at our house.

I hope we still have several more months but you never know with this weather!  My kids are playing outside right now and I have the house to myself.  It's just absolutely wonderful.

I've shared with you before that the hubs has a couple staple food items in his life.  One of them is cream cheese.   If I add cream cheese to anything he is in complete heaven. So I was intrigued by this idea of using cream cheese as a base for this pizza.  

OH.MY.WORD. He was in 7th heaven and had the hardest time not eating the whole batch.  He even loved them so much we made them for his work just a couple days later.  All the layers of cheese are delicious and they can be completely customized to your add taste buds. You can add veggies, ham, pineapple, really whatever you want. So yummy!

Hot Pizza Dip Bites

(click here for printable version)

8 oz cream cheese, softened
1/2 tsp dried oregano
1/2 tsp dried basil
1 tsp fresh minced garlic
1 cup shredded mozzarella cheese
1 cup finely shredded parmesan cheese
1 cup pizza sauce or good marinara sauce
Toppings: finely chopped pepperoni, sausage, pineapple, green peppers, ham, etc.
24 square wonton wrappers

1. Preheat the oven to 350°F. In a small bowl, whisk together the cream cheese, oregano, basil and garlic until smooth. Set aside.

2. Lightly grease a mini-muffin tin pan with cooking spray and press one wonton wrapper gently into each muffin tin, carefully but firmly pressing it into the sides of the cups. Bake the wonton wrappers for 4-6 minutes, or until lightly browned. Remove the pan from the oven, keeping the wonton wrappers in the mini cups.

3. Dollop a teaspoon of the cream cheese mixture into the bottom of each wonton cup. Sprinkle mozzarella cheese over the top of the cream cheese mixture. Top with a teaspoon of the pizza sauce, a sprinkle of parmesan cheese and finally your chosen toppings. Bake for 10 more minutes or until the filling is bubbly and wonton edges are golden brown. Serve warm!

Source: Mel's Kitchen Cafe

Friday, January 25, 2013

Bacon-n-Ranch Cheeseball

The hubs work always has food around.  He is constantly telling me about such and such and who brought it in and that I should try it.

And I have to admit I am quite guilty about adding to the food there too.

Especially when I am trying a new recipe.  I love to get other people's feedback before I post about it and they are great to try things out for me.

This deliciousness was brought to his work and everyone loved it. So much that Pam had to make a trip to the grocery store to buy ingredients for two more.  The hubs brought the recipe home to me and I promised him I would make it soon.

Wow!  This cheeseball is amazing.  It is great with crackers or corn chips.  The bacon sends it over the edge (of course because everything is better with bacon--right?).  Even the kiddos thought it was pretty wonderful, which is quite the ringing endorsement for me.

Bacon-n-Ranch Cheeseball


1 package dry ranch dressing mix
2 tbsp sour cream
1 (8oz) block cream cheese, softened
8 oz shredded cheddar cheese
Bacon, cooked and chopped

Crackers/Corn Chips for serving   

1. In a medium bowl combine sour cream and dry ranch dressing mix, until completely combined. Add cream cheese and cheddar cheese and fold together until everything is equally distributed. 

2. Spread bacon on a plate, roll cream cheese mixture in a ball and then roll in bacon, completely covering entire outside.  Place on serving dish, cover, and chill at least 1 hour.  Serve with crackers or corn chips.  Store leftovers in refrigerator.  Enjoy!

Friday, September 14, 2012

Grilled Pineapple Guacamole

Oh my, oh my, oh my!

This baby was absolutely delectable.  We love guacamole at our house and have tried many versions of it, but I think this is our favorite way. EVER.  I thought I had a favorite until now and oh man, what deliciousness.  This one totally beats the other, hands down.

The sweetness of the grilled pineapple with the avocado was a heavenly combo.  Like the angels are singing, the sun breaks through the clouds, and everything is right with the world.

Yep, not kidding, it was that heavenly.  Especially because I got to eat it,  That always makes things better too.  So put this on your menu for your next tailgate party (or if you hate football and never watch it, make it as soon as you can) and your guests and family will love you forever for it.

Grilled Pineapple Guacamole

(click here for printable version)


2-3 slices of cored and peeled fresh pineapple (canned works great too if you don't have fresh)
2 medium ripe avocados
1/2 small yellow onion, finely chopped
1/4 cup cilantro, finely chopped
3 tbsp freshly squeezed lime juice
3/4 tsp kosher salt
1 jalapeño pepper, seeded, and finely minced

1.  Heat a grill to medium-high.  Very lightly oil the grates.  Place the pineapple slices on the preheated grill and cook, turning once, until lightly charred on both sides.  Remove from the heat and let cool to room temperature.  Dice into medium sized chunks.

2.  Split each avocados and scoop the flesh into a medium bowl.  Mash with a fork until mostly smooth.  Stir in the onion, cilantro, lime juice, salt, and jalapeño and continue mashing until it has a fluffy whipped texture.  Taste and adjust seasonings to your preferences.  Stir in the diced pineapple and serve immediately with tortilla chips.  Enjoy!

Source: Annie's Eats

Wednesday, September 12, 2012

Corn Dog Bites

 
My youngest, Luke, is in love with corn dogs.  Every time we go out to eat he asks for a corn dog.  

On vacation this summer all he wanted to do was eat somewhere that had one (gosh that was easy--if only all the kids requests were that easy).

Every time, in the grocery store, we walk by the frozen foods and he sees the corn dogs, he asks and asks if we can just buy them.  I haven't given in yet.

You see, they are not my favorite things to eat.  If you drown them in enough ketchup and mustard then I will eat one, but it is not even on my top 100 list of things to eat.

But sometimes you just have to give in, so when I saw these, I knew what we were going to make.  They are a perfect size for appetizers and a huge hit with the guys.  Even my girls loved them but I know, for a football crowd, everyone would be in heaven.  Luke said that he even liked them better than the store kind--so you know they must be good.

Corn Dog Bites

(click here for printable version)


1 cup flour, divided
1/4 cup cornmeal
1/4 cup sugar
1 tbsp baking powder
1/4 tsp salt
1/2 tsp garlic powder
1/2 tsp onion powder
1 cup milk
8 hot dogs, cut into thirds
Vegetable or canola oil, for frying

1.  Preheat about 3 inches of oil to 350 degrees over medium heat. In a large bowl, combine 2/3 cup of flour, cornmeal, sugar, baking powder, salt, garlic powder and onion powder. Stir in the milk.  Set aside.

2.  In a pie plate or other shallow dish, add the remaining flour. Dredge each hot dog piece in the flour and then dip it into the cornmeal batter. Shake off any excess batter, but be sure that the hot dog is fully covered in batter.

3. Drop into the hot oil and fry for 3-4 minutes, turning halfway through, until golden brown and crispy. Fry in batches, being careful not to over crowd the pan.

4.  Drain on a paper towel lined plate and keep warm in a 200 degree oven until all of the hot dogs are fried.  Serve immediately with ketchup and mustard.  Enjoy!

Source: Buns In My Oven


Monday, September 10, 2012

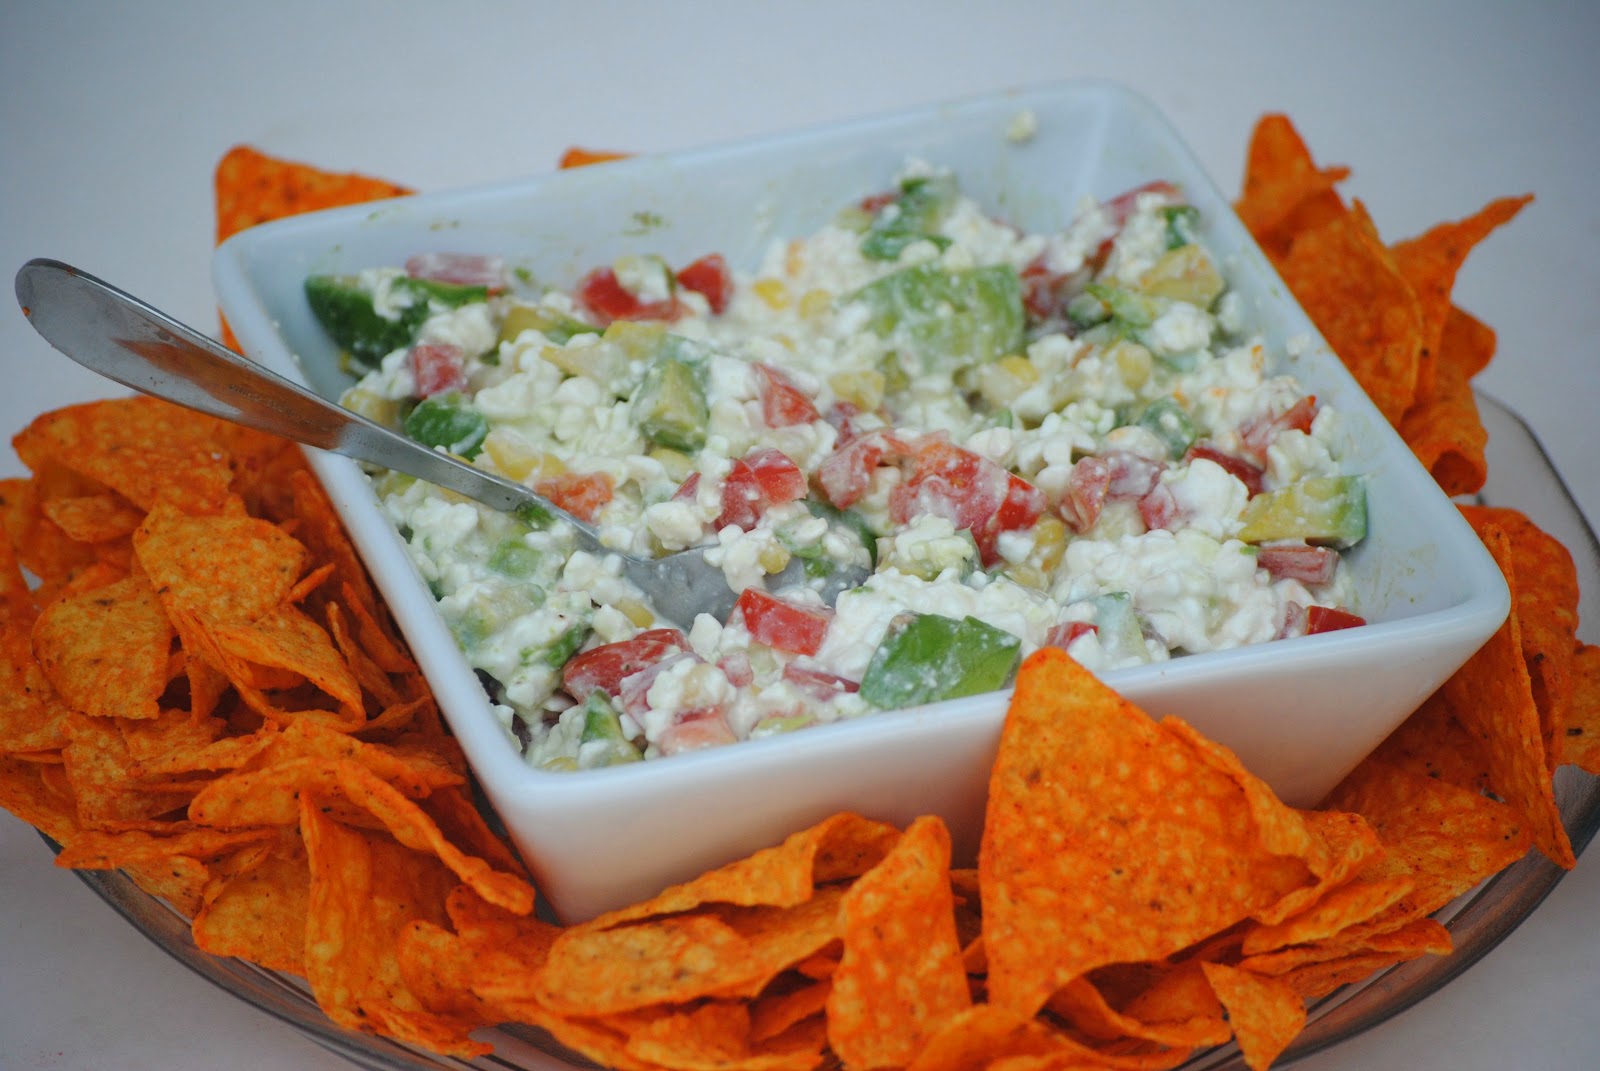
Dorito Dip

 It's begun.

Yep that's right!  Football season is here again.  I love this time of year because it means a party almost every weekend, which means appetizers, and that means lots of new and delicious things to try out.

This week I am going to share some of our new favorite appetizers with you.

One thing we always have around our house is cheese Doritoes.  My son will only eat that one kind of chip in his lunch so we always have a Costco size bag in the cupboard.  This dip was the perfect one to try because it is the best with cheese Doritoes.  There is just something about the combination that goes so well with the cottage cheese, tomatoes, and avocados.

Plus this appetizer is a cinch to whip up, throw out some chips with it, and watch your favorite football team play.  Go Broncos!!

Dorito Dip

(click here for printable version)


1 (24 oz) container cottage cheese
2 tomatoes, diced
2 avocados, diced
1/2 cup frozen corn, thawed
3 green onions, chopped
1/2 tsp. garlic powder
salt and pepper to taste

1.  Spoon cottage cheese into a medium-sized bowl. Fold in remaining ingredients until well combined. Serve with cheese Doritos.

Source: Favorite Family Recipes

Monday, September 3, 2012

Fruit Salsa with Cinnamon Chips

Happy Labor Day and September everyone!

Can you believe it?

September means back to school for us.  Yep my kids haven't started (the big day is tomorrow and Wednesday) and we have been busy trying to get all our summer projects and goals done.

I think I have shared with you that I love to read and so far all of my children love to read also.  The older two don't just read, they absolutely devour books.  I'm not kidding.  We are at the library all summer long (which is not a bad place to be in my opinion) getting new books.

Because they love to read they decided to take part in our orthodontist's contest this summer.  He always challenges the kids to see how many pages they can read over the summer.  The contest ended last Friday and we counted up pages.  Guess how many they read?!!?

I was completely dumbfounded and because I'm sure you won't guess, here it is:
Seth (who is 12) read 13237 pages and Sarah (who is 9) read 11054.

So crazy--we don't know if they won, but frankly, I don't care.  I think they are pretty awesome and so proud of them!!

And because it's Labor Day and that means parties, this would be awesome to take to a party or BBQ.  Everyone loved it, especially the homemade cinnamon chips (which are super easy).  Plus with all the fruit in season you can totally taylor it to whatever you have around and feel in the mood for.

Fruit Salsa with Cinnamon Chips

(click here for printable version)


Fruit Salsa:
2 kiwis, peeled and diced
2 Golden Delicious apples - peeled, cored and diced
8 oz raspberries
1 (16 oz) carton of strawberries, diced
2 tbsp brown sugar (you can add more or less to your taste)
2 tbsp fruit preserves, any flavor (I used raspberry)
Cinnamon Chips:
10 (10 inch) flour tortillas
melted butter or butter flavored cooking spray
Cinnamon sugar:
1 cup white sugar
2 tbsp cinnamon

1. In a large bowl, combine kiwis, apples, raspberries, strawberries, brown sugar and fruit preserves. Cover and chill in the refrigerator at least 15 minutes.

2. Preheat oven to 350 degrees. Coat one side of each flour tortilla with melted butter or butter flavored cooking spray. Sprinkle tortillas with desired amount of cinnamon sugar. Cut into wedges and arrange in a single layer on a large baking sheet. Spray again with cooking spray if you are using cooking spray (not needed if using butter).

3. Bake 8 to 10 minutes. Repeat with any remaining tortilla wedges. Allow to cool approximately 15 minutes. Serve with chilled fruit mixture and enjoy!

Note: This salsa can also be serve with cinnamon graham grackers or cinnamon pita chips. It is also best when made and eaten the same day otherwise the fruit gives off so too much juice and it gets runny.

Slightly adapted from: The Girl Who Ate Everything

Wednesday, August 15, 2012

Grilled Avocados

Middle of August--wow!

Anyone else out there can't believe that it's school time already?  My kids start in a couple weeks so we have been busy trying to fit in all our last minute summer plans.  

Some of my plans include trying all the new summer recipes I have pinned.  I have a hard time choosing what to make because one of my very favorite things about summer is grilling.  

Everything seems to taste better on the grill!

These grilled avocados were a favorite.  Absolutely delicious.  I have been trying to branch out and try new sides for dinner and this one has definitely made the "make again list".  The hubs and I loved the flavor the parmesan cheese gives the avocado.  So yummy.

Grilled Avocados

(click here for printable version)


1 avocado
1 tbsp chipotle sauce, like Tabasco (completely optional--I put some on 1/2 for the hubs)
1 tbsp lime juice
1/2 cup grated fresh parmesan cheese
Salt and pepper, to taste

1. Slice the avocado in half and remove the stone. Cut criss-cross patterns with a knife in each half of the avocado, being careful not to cut through the skin (this allows the sauce to penetrate the flesh).

2. Pour the sauce over each half (if using), then top with lime juice and salt and pepper. In the cavity where the stone has been, put ¼ of the cheese on each avocado half. Place under the hot grill for 2 minutes.

3.  Top with remaining cheese and broil for another 2 minutes until completely melted and avocado warmed through.  Serve and enjoy!

Source: Morsels and Musings

Wednesday, January 18, 2012

Hot Reuben Dip


Pin It
 No matter how many times I make this and take photographs of it (which we are up to 3 now), I think they look terrible.

I'm getting almost obsessive about it.  I try different bowls, different plates, different places in my house to take the pictures, different times of day, different settings on my camera, and guess what!!!!

They all look this bad.  So if this picture makes you not want to try this, I totally get it BUT (and you notice it's a big but...) it actually tasted fabulous.

The hubs keeps telling me to forget about it and just post it since it is his favorite of all time appetizers.  He gets so excited when I am making this because he absolutely and totally loves it and could devour the whole entire dip himself.

So in honor of him and me trying not to be upset about my ugly pictures, here it is!  If you like reuben sandwiches at all, this would be a hit.  And don't worry the sauerkraut is very mild and you hardly notice it is even there.  So here's to an amazing sandwich in lovely dip form.  Mmmm!!  

Hot Reuben Dip

(click here for printable version)


8 ounces cream cheese, softened
1½ cups (about 6 ounces) shredded Swiss cheese (I just buy it and shred it at home)
4 ounces deli sliced corned beef, chopped
½ cup Thousand Island dressing
½ cup drained sauerkraut

1. Preheat oven to 400°F.  In a large bowl mix together the cream cheese, 1 cup of the Swiss cheese, the dressing, corned beef, and drained sauerkraut. Spread in a pie plate or other shallow serving dish. Top with the remaining ½ cup of Swiss cheese.

2. Bake for about 15 minutes, or until bubbly around the edges. Serve hot with pretzel crisps or cocktail-size rye bread squares.  Enjoy!

Source: Brown Eyed Baker

Wednesday, January 11, 2012

Ultimate 7 Layer Dip


Pin It

Any of you football fans out there?

I've mentioned before that I come from a football family and the hubs does not.  Because of me we now follow BSU quite religiously, watch most of the BCS Bowl games (even though we think it a stupid system and needs to be changed), and follow my brother's NFL teams so we can be a part of the conversation when we get together.

And now that it's January the Super Bowl is coming up.  That's one game we don't usually watch unless the Denver Broncos are playing, which isn't likely but you never know with Tebow.  Ha, ha, I'm a poet and didn't even know it!

Okay that was lame but one thing we do enjoy about the Super Bowl is the fun foods that come around.  So I thought I would share with you some of our favorite appetizers.  

This is a ramped up 7-layer dip.  Most 7-layer dips are basically the same and that's why I love this version.  It has a touch of spiciness, great flavor, and absolutely delicious.  Plus it's perfect for any kind of party.

Ultimate 7-layer Dip


Tomato Layer:
4 large tomatoes, cored, seeded, and chopped fine
1 jalapeno, seeded and minced
3 Tbsp finely chopped cilantro
2 green onions, finely minced
2 Tbsp lime juice (if using fresh limes it's about 2)
1/8 tsp. salt

Guacamole Layer:
2 green onions, sliced thin, green and white parts separated
1 jalapeno chile, seeded and finely minced
1 small garlic clove, minced
2 Tbsp. lime juice (from about 2 fresh limes)
3 avocados, pitted, peeled and chopped
3 Tbsp. chopped fresh cilantro
Salt to taste

Black Bean Layer:
1 16-ounce can black beans, drained but not rinsed
2 garlic cloves, minced
2 teaspoons fresh lime juice (from about 1 fresh lime)
3/4 tsp. cumin
1/4 tsp. salt

Sour Cream Layer:
1 1/2 cups sour cream
1 cup shredded pepper jack cheese

Cheese Layer:
1 cup shredded pepper jack cheese
1 cup shredded sharp cheddar cheese

Tortilla chips, for serving

1.  For the tomato layer, in a medium bowl, combine tomatoes, jalapeno, cilantro, minced green onions, and lime juice. Stir in salt and let stand until tomatoes begin to soften, about 30 minutes. Strain mixture through a fine mesh strainer or colander and discard the liquid. Set aside.

2.  For the guacamole, in a small bowl, combine the white parts of the green onions, jalapeno, garlic and lime juice. Let sit for 30 minutes. Add two-thirds of the avocado to the bowl with the jalapeno mixture and mash with a potato masher until smooth. Gently fold remaining avocado into mashed avocado mixture. Gently stir in the green parts of the green onions and the cilantro. Season with salt. Set aside.

3.  Pulse black beans, garlic, remaining lime juice, chili powder, and remaining salt in a food processor until mixture resembles a chunky paste. Transfer to a glass 8X8 or 9X9-inch dish or similar sized bowl, spreading into an even layer. 

4.  In a medium bowl combine the sour cream, 1 cup pepper jack cheese cheese and 1 cup sharp cheddar cheese and stir until smooth. Dollop the sour cream mixture on top of the black bean layer, smoothing to the edges in an even layer.

5.  Sprinkle evenly with remaining cheese. Spread guacamole over cheese and top with tomato mixture. Sprinkle with additional sliced green onions, if desired, and serve with tortilla chips. The dip can be tightly covered and refrigerated for up to 24 hours.  Enjoy!

Source: slightly adapted from Mel's Kitchen Cafe

Wednesday, September 7, 2011

Mini Mac-n-Cheese Pies

Today I am so excited to be taking part in Mom's Crazy Cooking Challenge.  Thanks Tina so much for doing this!
Photobucket

Our first challenge was mac-n-cheese.  We take a recipe that we have never made before, cook it up, share it with our readers, link up to the party, and have everyone vote for their favorite (don't forget to "like" my recipe--shameless I know but I have amazing readers!)

I found this lovely lady at The Curvy Carrot.  Isn't that such a fun name.  She has some great recipes, and a fun blog, go check her out and say hi!
I have shared with you before how much we love homemade mac-n-cheese at our house.  The box stuff doesn't really cut it.  We need real cheese and real butter, mmm...delicious.

Plus mac-n-cheese is one of those timeless meals.  I remember it from my childhood and I know my kids will remember me making them homemade mac-n-cheese.

One of the reasons I think it is timeless is because of all the variations.  I mean you can make mac-n-cheese with pretty much every kind of cheese known to man; cheddar (the varieties in this family alone are amazing), pepperjack, havarti, bleu, colby, parmesan, ricotta, and list goes on with cheeses most of us didn't even know existed.

Not to mention the ways to make it. We could have a whole discussion on ways to make this fantastic meal.  You can bake it, microwave it, add mustard or evaporated milk, jalapenos or red pepper flakes to make it spicy, or sour cream, cream cheese, and cream.  

Then you could move on to the vegetables; spinach, corn, mushrooms, peppers, onions, peas, and so on.  

What about the meats?  Bacon--so delicious, ham or tuna--totally gross in my opinion but my dad loves it.

Can you see why I love this meal and it's classic nature?

Today I wanted to share something that goes along with what I was talking about, so many different ways to make this lovely food.  Did you ever think about putting it in pie form?

I didn't until now and why not!  It is be perfect as an appetizer or even as a main dish.  They are just the right size to hold in your hand or if you don't like your hands messy, use a fork.  They are absolutely delightful especially with the ritz cracker/cheese/butter crust.  It adds such nice flavor and a little crunch, mmm...so yummy!
Mini Mac-n-Cheese Pies

1 and 1/2 c. Ritz crackers, crushed (1 whole sleeve--I used my food processor and it worked great)
2 c. white cheddar cheese, grated and divided
4 Tbsp. unsalted butter, melted
4 and 1/2 c. cooked elbow macaroni (about 8 ounces uncooked)
One 5.2-ounce container of Boursin Garlic and Herb cheese (I found mine at Costco)
2 Tbsp. unsalted butter, cold
2 large eggs
1/2 c. milk
1/4 c. sour cream
1/4 tsp. salt
Pinch red pepper flakes
Parsley, for garnish, optional

1. Preheat the oven to 350 degrees.  Generously spray cups of your muffin pan with non-stick cooking spray.

2. In a large bowl, combine the crushed Ritz crackers, 1 cup of the shredded white cheddar cheese, and the melted butter, mixing well until the mixture holds together and resembles coarse sand.  Divide the mixture evenly among the muffin cups and, using your fingers or the back of a spoon, firmly press the crust into the bottoms of each muffin cup.

3. In another large bowl, combine the cooked, and still hot macaroni with 1/2 cup of the shredded white cheddar, the Boursin cheese, and the butter, mixing well.

4. In a small bowl, combine the eggs, milk, sour cream, salt, and red pepper flakes, mixing well.  Add the egg/milk mixture to the cooked macaroni, mixing until all the ingredients are melted and smooth.

5. Place about 2-3 tablespoons of the macaroni mixture into each muffin cup.  If you have any leftover macaroni you can save it and bake it separately, if desired.  Top each muffin cup with the remaining white cheddar.  Bake the mac and cheese pies until lightly golden on top, about 20-25 minutes.

6. Let cool slightly before removing from the muffin pan, garnish with parsley, and serve immediately.  Enjoy!

Source:  The Curvy Carrot

Now onto the rest of the mac-n-cheese recipes.  Check them out, leave some love (comments :), and vote for my mac-n-cheese pies!


Friday, February 4, 2011

Chicken-n-Bacon Pizza Rolls

At risk of offending all of you football fans out there, I have to admit something:

We don't watch the Super Bowl!

We are not NFL football fans (I put a classification on that because we are definitely College football fans--go BSU!).  I grew up in a house that went to every high-school football game (even when no family member was on the team) and I had 4 brothers that were all linemen.  We also zealously rooted for the Denver Broncos, but I guess none of that rubbed off on me.  My husband's family hardly ever watched NFL football.  So when we got married, it never even crossed our minds to even watch the Super Bowl.

The primary benefit of the Super Bowl in our house are all the amazing appetizer recipes that I find.  We have some friends that throw a "we're not watching the Super Bowl party" every year just so we can try many of those tasty appetizers.  This is what I am bringing.  They were absolutely amazing! I was a little worried about the kids eating them, because they're "different" (and with my kids that's not usually a good thing) but they ate an entire pie plate full of the pepperoni and cheese rolls.  They loved dipping them, I mean what person kid doesn't love to dip!

These would work great for dinner too.  You can make them to fit anyones likes or dislikes. My husband and I loved the chicken-n-bacon.  Great flavor and just pure yumminess!

1 roll refrigerated pizza dough, (or make your own)
1 packet Hidden Valley Ranch Dressing mix
2 T. grated Parmesan cheese
1 T. melted butter
Mozzarella cheese, cubed (fresh is awesome! we used 1/2 mozzarella and 1/2 cheddar because my husband loves his cheddar)
8 slices bacon, cooked and crumbled
1 C. shredded, cooked chicken
3/4 C. mayo
3/4 C. milk
*or any other ingredients for your favorite pizza (pepperoni, pineapple, ham, peppers, sausage, onions, etc.)

1.  Take 1 teaspoon of your ranch dressing mix and combine it with 1 1/2 T parmesan cheese. Set aside. Combine the remaining ranch mix with mayo and milk and place in the fridge to chill.

2.  Preheat oven to heat specified on pizza dough package. If you are making your own, 425 degrees.
Unroll your pizza dough onto a lightly floured surface. Pat or roll the dough so it's about 12" by 8". You're going to want to cut it into 24 squares, so just eyeball it if you need to. Use a pizza cutter to slice the dough into 24 squares.  Place cheese and desired toppings on each square.
3.  When all of your dough squares have cheese and toppings on them, carefully lift up each square and wrap the dough around the toppings.  I grab the four corners first and then squeeze the seams shut. Then place them seam side down in a lightly sprayed pie pan (or similar sized dish). Brush with melted butter sprinkle with the parmesan-ranch mixture.

4.  Place rolls in the oven. The baking time really depends on the type of dough you're using. Whether it's different brands from the store, or homemade dough, they all take different amounts of time. Set your timer for 10 minutes and check on them after that. They may take up to 15 or 20 to be done. Take them out when they're lightly golden on top.  Serve them warm with a side of pizza sauce for dipping.  If you're feeling adventurous, you can also use freshly made ranch dressing or, if you're my husband, bleu cheese dressing.
Enjoy!

Source:  Best Bites

Some other great appetizers for your party:

Tuesday, December 28, 2010

Bloomin Onion Bread

See this beautiful bread above?  It is a homemade artisan bread, a boule.  I found an amazing book.  It's called "Artisan Bread in Five Minutes A Day".  It has great instructions on making fresh artisan breads.  They are so yummy and surprisingly very easy.  If you have ever wanted to make your own artisan breads, this is a great resource.  It has so many recipes and great instructions on getting started.

 This Bloomin Onion Bread has been on my list menu for our New Years Party for awhile.  It is absolutely delicious and I knew that making my own artisan bread was perfect for this--don't worry, the boughten sourdough bread works great too.  This is always a hit everywhere I take it.  If you don't like onions, don't worry they are not strong, but they do add a wonderful flavor.  Go ahead, make it for your party, all your guests will love it!


1 unsliced loaf (round is preferable) sourdough bread
1 pound Monterey Jack cheese, thinly sliced
1/2 c. butter, melted
1/2 c. finely diced green onion, with tops
2-3 t. poppy seeds

1.  Preheat oven to 350 degrees.  Cut the bread lengthwise and widthwise - without cutting through the bottom crust. Place on a foil-lined baking sheet.

2.  Insert cheese between cuts. Combine butter, onion, and poppy seeds. Drizzle over bread. Wrap in foil; place on a baking sheet. Bake for 15 minutes. Unwrap. Bake 10 more minutes, or until cheese is melted.  Enjoy!

Source:  See Jane In The Kitchen

Sharing this with: Crafty Cierra

Wednesday, December 15, 2010

Mozzarella Stuffed Meatballs

Let me tell you a secret about my daughters--okay it's probably not a secret anymore but they Never, Ever get enough of Spaghetti.  If dinner was up to them we would have it every night, it's not a joke!  Every time I ask them what they might want, as a chorus, they say, "Spaghetti"!  Sometimes I get sick of it so in an effort to make for them I try to do something different each time.  We have tried it with focaccia bread, with cheesy bread to name a few, but this time we tried meatballs.  They were fantastic and so easy to make.  I loved the gooey, cheesy middle and dressed up the spaghetti into a fancy, albeit, frequent dinner!


1 pound lean ground beef
1 pound ground pork (or you can use all beef)
1/2 teaspoon dried basil
1/2 teaspoon dried oregano
2 Tablespoons dried or fresh parsley
1/2 teaspoon garlic powder
salt and pepper
2 eggs
1 cup bread crumbs
8 ounce package mozzarella, cut into small cubes (about 1/4 inch in size)

1.  Mix all ingredients and form into walnut sized balls, forming meat around cheese cube. Cook in olive oil in a large pan over medium heat. Try to be gentle, the cheese tends to ooze out if you turn too much. Serve over spaghetti. Top with parmesan.

This makes about 2 1/2 dozen meatballs.  They are great frozen and pulled out later if that is too much for your family or the recipe works great cut in half.  Enjoy!

Source:  See Jane in the Kitchen

Thursday, September 9, 2010

BBQ Jalapeno Poppers


photo
(picture from yourhomebasedmom)


We were invited to a friend's surprise birthday party and they wanted us to bring appetizers.  I have been wanting to try these especially because I saw them on Pioneer Woman and Home Based Mom.  I am really not a fan of boughten poppers but everything is better homemade right?  These were awesome!!  They were gone so fast I didn't even get a picture.  They are just slightly hot but the flavor is amazing.  This would be perfect for a tailgate party.


18 fresh jalapenos
1  – 8 oz. package cream cheese
1/2 c. grated cheddar cheese
1 green onion, sliced
18 slices thin bacon, cut into halves
Bottled BBQ sauce (we prefer Sweet Baby Rays)
Toothpicks
rubber gloves

1.  Preheat oven to 350 degrees.  Cut peppers in half lengthwise (wear gloves--very important).  Try to keep the stems intact.  They look prettier that way.  With a spoon, scrape out the seeds and light colored membranes.  Remember:  the heat comes from the seeds and the membranes so if you can handle the heat, leave some of them intact.

2.  In a bowl combine the cream cheese, cheddar cheese and chopped green onion.  Mix together gently.
Stuff the hollowed out pepper half with the cream cheese mixture.  Wrap bacon slices around each half, covering as much of the surface as you can.  Be careful not to stretch the bacon too tightly around the pepper as the bacon will contract as it cooks.  Brush the surface of the bacon with your favorite BBQ sauce.

3.  Secure the jalapenos with toothpicks and pop them in the oven for 1 hour or until the bacon is cooked and sizzling.  Serve hot or at room temperature.

Friday, June 11, 2010

Pizza Bites

This is a wonderful appetizer.  Perfect for the kids and anything really can be added to the inside.  We enjoyed these for a little get together and they hit the spot.  I found these here.

Pizza dough for 1 pizza
4 oz. mozzarella cheese, cubed (abt. 20-24 pieces)
Sliced pepperoni
Olive oil
Italian seasoning
Parmesan cheese, grated

* Preheat oven to 400 degrees.  Lightly grease a 9-inch pie pan or cake pan.  Divide the pizza dough into 20-24 roughly equal sized pieces.  Take one of the dough pieces, top with a cube of cheese and 2 slices of pepperoni.  Pull dough around the edges of the pepperoni and cheese and pinch closed.  Place seam side down in the baking dish.  Repeat with remaining dough.

*  Lightly brush the tops of the dough balls with olive oil.  Sprinkle with italian seasoning and parmesan cheese.  Bake for 20 minutes or until the tops are golden brown.  Serve warm with pizza sauce or ranch (what my kids like).

Thursday, March 4, 2010

Guacamole Bruschetta

Mmm!  We love avocados so when I found this on Blog Chef I knew I needed to try it.  It turned out very yummy and would be perfect for an appetizer or summer party (I know, I know it's a little early for that but the sun is out and we have reached 50 degrees).  We added the cheese but feel free to skip that step.

1 loaf french bread, sliced into 1/2" pieces
1 c. fresh parmesan chees
1 t. minced garlic
2 T. olive oil
2 roma tomatoes, chopped
2 avocados, chopped
1/3 c. onion, finely chopped
1/4 c. cilantro, finely chopped
2 T. lime juice
1/2 t. kosher salt
1/4 t. pepper

* Preheat oven to 400 degrees.  Arrange french bread slices on cookie sheet.  Toast for 3 minutes on one side.  Remove from oven, flip over and brush each slice with olive oil.  Sprinkle about 1 T. cheese on each slice and put back in oven for another 3 minutes.  Set aside.

*  In large bowl combine garlic, tomatoes, avocados, onion, cilantro, lime juice, salt and pepper.  Mix well.  Place about 2 T. of avacado mixture on each piece of toast and serve.

Wednesday, January 13, 2010

Coconut Chicken


I dediced to be a little adventurous last night and try this recipe.  It turned out really yummy, as long as you like coconut.  Because you cut it into chunks, I think it would work great as an appetizer too.  We served this with Panda Express Orange Sauce or you could use orange marmalade also.

3 boneless, skinless chicken breasts, cut into 1 1/2 inch chunks
1 T. cornstarch
1 t. coriandor
1/2 t. salt
1/3 c. flour
3 egg whites, beaten until foamy
2 T. honey
3 c. sweetened, shredded coconut
Orange Sauce/Orange Maramlade

* Preheat oven to 400 degrees.  Cut chicken into chunks, rinse under cold water and dry with paper towels.  In a ziploc bag, combine cornstarch, coriandor, salt and flour.  In medium bowl, beat egg whites.  Add honey and mix thoroughly.  Put coconut in another bowl.

* Line a cookie sheet with tin foil and grease (I used Pam cooking spray).  Place chicken in ziploc bag and shake to coat well.  Then dip each piece in egg white mixture, then coconut (making sure all sides are coated) and lay on cookie sheet.  Place in oven and bake for 10 minutes.  Turn cookie sheet, to ensure even baking, and cook 10 more minutes, or until light brown and chicken is no longer pink.  Remove from oven and cover in orange sauce.  Serve.  If you want to serve as appetizer, place toothpicks in each piece.

Thursday, January 7, 2010

7-layer Dip


This is a super fast , yummy appetizer.  The toppings can be adapted to your tastes and can be made ahead of time. 

1 24 oz can refried beans
16 oz. sour cream
1 taco seasoning packet
2 avocados, smashed
2 medium tomatoes, chopped
1 c. olives, sliced
1 c. cheddar cheese
Tortilla chips

* Mix sour cream and taco seasoning together.  Then in an 8 x8 casserole dish (you can use a larger dish, if you want each layer thinner) layer each ingredient in the above order, except tortilla chips.  Refrigerate until ready to serve.  Serve with chips.

Tuesday, January 5, 2010

Cheesy Artichoke Dip


I made this last night for a football party (Go BSU!!) and it was a hit. 

24 oz. artichoke hearts, drained
1 c. mayonnaise
8 oz. sour cream
1 c. fresh parmesan cheese, grated
8 oz. cream cheese
1/2 t. pepper
1 t. garlic, minced

* Preheat oven to 375 degrees.  Using hand mixer, combine mayonnaise, sour cream, cream cheese, pepper and garlic.  Stir in artichoke hearts and parmesan cheese.  Put in casserole dish and bake until bubbly.  Serve with crackers or chunks of french bread.

Monday, December 28, 2009

Greek Hummus Pizza


Do you need something different than the regular pizza?  When I get that craving I make this pizza that I found in a Pampered Chef cookbook.  I love the flavors together and is a nice change.  This is also great as an appetizer.

1 recipe Pizza Dough
1 T. olive oil
Hummus
Roma Tomatoes, chopped
Cucumbers, chopped
Artichoke Hearts, drained
Olives, chopped
Feta Cheese

*  Make pizza dough.  Roll out on your pan, brush top with olive oil and cook at 425 degrees for 14-16 minutes or until light brown.  Remove from oven and let cool.

*  Spread hummus over crust (I use a basic hummus with just a little bit of garlic in it).  Layer with tomatoes, cucumbers, olives, artichoke hearts and feta.  Serve.

Blogging tips