Showing posts with label Cookies. Show all posts

Friday, May 3, 2013

Soft Chocolate Sugar Cookies

I think everyone NEEDS another chocolate cookie in their recipe books.

Don't you think?

Seriously, one can never have too many chocolate cookies really ever in their life. 

We are big sugar cookie fans at this house and I LOVE my sugar cookie that was handed down to me from my grandmother but I haven't really found a chocolate sugar cookie that I have really loved.  I was very pleasantly surprised by this little beauty.  It was soft, chewy, moist and oh so chocolately.  Perfect I'd say for a cookie.  

Soft Chocolate Sugar Cookies


1/3 cup granulated sugar
1 1/2 cups plus 2 tablespoons all-purpose flour
3/4 cup unsweetened cocoa powder
1/2 tsp baking soda
1/4 tsp baking powder
14 tbsp butter
1 3/4 cups packed dark brown sugar
1 tbsp vanilla extract
1/2 tsp salt
1 large egg plus 1 egg yolk

1. Preheat the oven to 350°F. Line cookie sheets with Silpat liner or parchment paper and set aside.

2. Pour granulated sugar in a shallow dish like a pie plate and set aside. In a medium bowl, stir together the flour, cocoa, baking soda and baking powder.

3. In a large bowl, melt 10 tablespoons of the butter in the microwave, until just melted. Stir in the remaining 4 tablespoons of butter until melted. Allow the butter to cool for 5-10 minutes (it should be about 90-95 degrees on an instant read thermometer). After the butter has cooled whisk in the brown sugar, vanilla and salt until completely smooth. Whisk in the egg and egg yolk and stir until smooth. Stir in the flour mixture until just combined.

4. Roll the dough into balls, about 2 tablespoons for each cookie. Roll the balls in the granulated sugar and place on prepared baking pans. Using the bottom of a glass, flatten the cookies to about 1/4-inch thick, but not get too thin. Sprinkle the tops of the cookies with a bit more granulated sugar.

5. Bake cookies until they have puffed and have cracks running through the top, about 11-14 minutes. Don't overbake or the cookies will be dry and hard. Transfer the cookies to a baking rack to cool completely. Enjoy!

Source: Mel's Kitchen Cafe

Monday, April 29, 2013

Frosted Peanut Butter Cookies

Spring is in full swing at this house. Hence (why I forgot to post last Friday--sorry peeps but sometimes this momma has got to go play!)

We have been busy planting our garden, pulling weeds, fertilizing the bushes, taking walks, watching three versions of "Willy Wonka" all in one week, and just playing.

It's been wonderful. And we have loved every minute of it.

One day though the kids were craving some cookies so we decided to make some together. And since peanut butter and chocolate are always the best thing in this house (and this girl has been dying to make these beauties) we made amazing cookies.

Wow! These are probably one of my favorite cookies yet. The combination of the two frostings on top were TO.DIE.FOR. No one could stay out of them and needless to say, they soon got carted off for other people to enjoy because this house had already eaten half the batch. 

You should totally make them today! 

Frosted Peanut Butter Cookies

(click here for printable version)

Cookies:
1 cup butter, room temperature
1 cup brown sugar
1 cup sugar
1 tsp salt
1/2 tsp baking powder
1/2 tsp baking soda
1 tsp. vanilla
2 eggs
3 1/4 cups flour
1 (12 oz.) bag Reeses Peanut Butter chips (No substitutes)

Peanut Butter Frosting:
1/2 c. unsalted butter, room temperature
1/2 c. creamy peanut butter
1 tsp. vanilla
3 c. powdered sugar
milk, to reach desired consistency

Chocolate Frosting:
1/2 c. unsalted butter, room temperature
2 Tbl. unsweetened cocoa powder
1 1/2 tsp. vanilla extract
3 c. powdered sugar
milk, to reach desired consistency

1. To make the cookies, preheat oven to 350°F .  Line baking pan with Silpat liner or parchment paper. Set aside.

2. Cream together butter, brown sugar, sugar, salt, baking powder and baking soda.  Add vanilla and eggs and mix well.  Add the flour and peanut butter chips and mix just until no dry streaks remain. Scoop dough into 2-inch balls and place on prepared cookie sheets and bake for 12-13 minutes or until set.  Cool completely.

3. To make peanut butter and chocolate frosting. Combine ingredients in separate bowls and whip until frosting reaches your desired consistency. When cookies are cooled, frost with peanut butter frosting,  then frost on top of the peanut butter frosting with the chocolate frosting, being careful to leave a small space between the edge of the two frostings to give it a layered look.

Source: Chef-In-Training via Eat Cake for Dinner


Friday, March 22, 2013

Carrot Cake Cookies

Growing up we had carrot cake once a year.  

And it was always on my Dad's birthday.  He L.O.V.E.S. carrot cake.  And usually I looked forward to it too.

Well as long as my mom didn't put in raisins and walnuts but of course that was my Dads favorite part. This year he had carrot cake once again for his birthday (and so did my carrot cake hating sister--I was so proud of her!) and it reminded me of that wonderful little dessert.

But...only the hubs and I like carrot cake so I was on a mission to find something my children would eat and something that didn't require having an entire cake sitting around.  And that's when it hit me.  

Cookies. But with carrots. Weird but hey in cake they are awesome.

Well I am proud to say these turned out fabulously.  And the best bart, the kids loved them and not one of them said anything about carrots being in there.  It does help that cream cheese is drizzled over the top but hey!  they have come along way. There is hope for them and I really hope you try these lovelies out. So delicious.

Carrot Cake Cookies

(click here for printable version)

2 cups all purpose flour
1 1/2 tsp baking soda
1/2 tsp salt
1 tsp cinnamon
1/2 cup granulated sugar
1/2 brown sugar
1/2 cup butter, softened
1 egg
1 tsp vanilla
1 cup grated carrots
1/2 cup shredded coconut
1 cup white chocolate chips
Frosting:
4 oz cream cheese, softened
1/2 tsp vanilla
1 tbsp milk
2-3 cups powdered sugar

1. Preheat oven to 375°F and line baking sheets with silpat liners or parchment paper or spray with non stick cooking spray.  Set aside.

2. In medium bowl combine flour, baking soda, salt, and cinnamon. In another large bowl cream sugars and butter until light and fluffy, 2-3 minutes. Add egg and mix well again. Stir in vanilla and grated carrots and completely combined.  With mixer on low, slowing add dry ingredients and mix until no dry streaks remain.  Stir in coconut and white chocolate chips.

3. Drop by tablespoon on baking sheets, spacing 2 inches apart. Bake for 9-11 minutes or until centers are set. Remove and let cool 2 minutes on baking sheets before letting cool completely on cooling rack.

4. To make frosting, in medium bowl whip cream cheese, vanilla, and milk until smooth. Slowly add powdered sugar until the consistency you want.  Put frosting in piping bag (or in a Ziploc bag and cut off the corner) and pipe on cooled cookies. Enjoy!

Monday, March 18, 2013

Frosted Chocolate Cupcake Tops

Any people out there that would only eat the top off of the cupcake?

Come on.  Admit it.

(okay fine! me raising my hand)

That's the best part in my opinion. That's where all the frosting is and yet you get a little bit of cake but not too much.  Man I think I'm drooling on my keyboard just thinking about it.

When I catch my kids doing it (and so many others) I certainly can't complain.  They are just like me, they know where the good stuff is.

IF I have to eat cake I have two favorites.  Yellow cake with chocolate frosting and chocolate cake with chocolate frosting.  So delicious.  These little bites of goodness are even better than a cupcake.  You just get the top part with lots of yummy frosting.  And a few sprinkles.  Cause everything tastes better with sprinkles!!

Frosted Chocolate Cupcake Tops

(click here for printable version)

Cupcake tops:
1 3/4 cups all-purpose flour
2 tbsp unsweetened cocoa powder
1/2 tsp baking soda
1/2 tsp salt
2 oz. unsweetened chocolate, finely chopped
8 tbsp butter, at room temperature
1 cup sugar
1 large egg
1 tsp. vanilla extract
3/4 cup buttermilk (or plain yogurt)

Frosting:
1 cup semi-sweet chocolate chips
1/3 cup plus 1 tbsp sour cream
1 cup powdered sugar, sifted

1. Preheat oven to 375° F.  Line baking sheets with silicone mats or parchment paper and set aside.  In a medium bowl, combine the flour, cocoa powder, baking soda, and salt. Whisk to blend, and set aside.  Place the chopped chocolate in a glass bowl and melt in short intervals in the microwave until smooth.  Set aside and let cool until just barely warm to the touch.

2. In the bowl of an electric mixer, combine butter and sugar and beat on medium-high speed until light and fluffy, about 2 minutes.  Beat in the egg.  Blend in the vanilla and melted chocolate until smooth.  With the mixer on low speed, add in half of the dry ingredients, mixing just until incorporated.  Then add in the buttermilk and mix just until smooth.  Then mix in the remaining dry ingredients.

3. Drop the dough in spoonfuls onto the prepared baking sheets, ( a medium scoop is perfect for this) spacing each about 2 inches apart.  Bake 8-10 minutes or just until set.  Let cool on the baking sheet for 2 minutes before transferring them  to a wire rack to cool completely before frosting.

4. To make the frosting, place the chocolate chips in a glass bowl and melt in the microwave in short intervals, stirring until smooth.  Stir in the sour cream.  Whisk in the powdered sugar until the mixture is smooth and glossy.  If necessary, adjust the consistency with additional powdered sugar to thicken or sour cream to thin it out.  Frost cookies as desired and decorate with sprinkles. Enjoy!

Source: Annie's Eats

Friday, March 8, 2013

Brown Sugar Crackle Cookies

Coming home from running errands today my 6 year old said to me, "Mom you are so smart! You know the answer to all my questions."

Boy that just melted my heart and only did I wish I knew all the answers.  It's pretty easy to guess when the question is "what do you think the color is of the paper is that they sent home today for the pancake breakfast that is the day before St. Patricks Day?"

Green and I even got it on the first try.  I know I'm pretty good!

Now if he were to ask me "what is your favorite cookie" (and by the way the one that has tempted me the most to eat in the past year)?  I would definitely say this beauty.  Hands down. Nothing is even a close second at this point.  And totally not kidding.

Everyone always dies over these sugary, brown, bites of amazingness.  It probably has something to do with the fact that they are filled with browned butter and brown sugar and not much else.  Life can't get much better when your cookies (and many other things :) are made of those two little things. 

This cookie must go on your "totally have to make today" list. They are that good.

Brown Sugar Crackle Cookie

(click here for printable version)


14 tbsp butter, divided
1/4 cup granulated sugar
2 cups packed dark brown sugar, divided
2 cups plus 2 tbsp unbleached all-purpose flour
1/2 tsp baking soda
1/4 tsp baking powder
1/4 tsp table salt
1 large egg
1 large egg yolk
1 tbsp vanilla extract

1. Heat 10 tablespoons butter in a stainless steel (do not use nonstick) skillet or small uncoated saucepan over medium heat until melted, about 2 minutes. Continue to cook butter, swirling pan constantly until butter is dark golden brown and has nutty aroma, 1 to 3 minutes (browned butter can burn easily and quickly so keep a close eye on it). Remove the skillet or pot from the heat and transfer the browned butter to a large heatproof bowl. Stir in the remaining 4 tablespoons butter into the hot butter to melt; set aside for 15 minutes.

2. While butter is cooling, adjust an oven rack to the middle position and heat the oven to 350°F. Line 2 large baking sheets with parchment paper, silpat liners or lightly coat them with non-stick cooking spray. Whisk flour, baking soda, and baking powder together in a medium bowl; set aside.

3. Add remaining 1 3/4 cups brown sugar and salt to the bowl with the cooled butter and mix until no sugar lumps remain, about 30 seconds. Scrape down the sides of the bowl with a rubber spatula; add the egg, the egg yolk, and vanilla and mix until fully incorporated, about 30 more seconds. Scrape down the sides of the bowl. Add the flour mixture to the butter mixture and mix until just combined, about 1 minute. Give the dough a final stir with a rubber spatula to ensure that no flour pockets remain and the ingredients are evenly distributed (the dough will not look exactly like regular cookie dough but not worries it is right).

4. In a shallow baking dish or pie plate, mix the granulated sugar and the remaining 1/4 cup packed brown sugar, rubbing the sugars between your fingers, until well combined; set aside. Divide the dough into 24 portions, each about 2 tablespoons, forming balls about 1 1/2 inches in diameter. Working in batches, toss the balls in the reserved sugar mixture to coat and set them on the prepared baking sheet, spacing them about 2 inches apart and 12 dough balls per sheet.

5. Bake one sheet at a time until cookies are browned and still puffy and edges have begun to set but the centers are still soft (cookies will look raw between cracks and seem underdone but don't overbake), about 11-13 minutes. Cool the cookies for 1-2 minutes on the baking sheets and then remove to a wire rack to cool completely. Enjoy!

Source: Mel's Kitchen Cafe via Cook's Illustrated

Friday, March 1, 2013

Pazookie [Cookie in a Jar]

Happy March everyone!!

Crazy--time is flyin'. Now if we can get the weather to cooperate I will love it even more.

Have you ever had a pizookie--you know a gooey cookie cooked on a pizza pan and topped with some delicious ice cream?  I think they are fabulous, a giant chocolaty goodness.  It's all about doing the normal different.

I love jars for that reason.  Take the normal everyday food, put it in a jar and it magically becomes an amazing bite of deliciousness.

I love the look of food in jars plus, with a jar, everyone has their own serving. My kids went wild over these.  Their own jar, with a cookie in it, and with a scoop of ice cream.  Their world couldn't get much better than that. Love it!  

Pazookie [cookie in a jar]


12 (4 oz) jelly jars (I get mine from Amazon)
2 1/2 cups all-purpose flour
1 tsp baking soda
1 tsp salt
1 cup butter, softened
3/4 cup sugar
3/4 cup packed brown sugar
1 tsp vanilla extract
2 large eggs
12 oz. package of your favorite chocolate chips

1. Preheat oven to 375°F. and spray your jelly jars with non-stick cooking spray and set aside.

2. In a medium bowl combine flour, baking soda and salt. In the bowl of your stand mixer, beat butter, sugar, brown sugar and vanilla extract until creamy. Add eggs, one at a time, beating well after each one. Gradually beat in flour mixture. Stir in chocolate chips.  Fill jars 1/2 way with cookie dough.

3. Bake 11-13 minutes. You want the cookie dough to have a blonde not browned top and be not be cooked completely.  Remove from oven and let cool. Serve with ice cream and enjoy!

Source: Whipperberry

Monday, February 18, 2013

Nutella Kiss cookies

I've been thinking lately about some things.  Mostly about women/mom things.

You see I want to be amazing.  All too often I think that means amazing at every single thing.  Amazing at cooking, parenting, cleaning, working, laundry, decorating, driving, exercising, and so many others.

I think so many other women think the same thing too.  But too often we fall short in most of those categories and then we think we are not good at anything.  We fail to see all the things we do well and only pay attention to all the things we don't do well.

It makes me sad.  Mostly because I am guilty of it too.  I want to be the super mom, the super wife, and the super woman.  And it's super according to what we THINK others think we should be doing.  But we shouldn't be comparing.  We are all at different points so comparisons are so pointless, they just make you feel worse.

So this is to all those women that don't think they are very super.  You are. I promise.  Remember to focus on all the super things you do and stop paying attention to all the super things you don't do. You are amazing right now.

And this cookie is for you.  An amazing, super yummy cookie that screams "you are enough".

Nutella Kiss Cookies


1/2 cup butter flavored shortening (not butter or margarine)
1/2 cup Nutella
1/2 cup granulated sugar
1/2 cup brown sugar, packed
1 tsp baking powder
1/4 tsp baking soda
1 egg
2 tbsp milk
1 tsp vanilla
1 3/4 cup all purpose flour
1/4 cup granulated sugar for rolling
36 Hershey Kisses, unwrapped

1. Preheat oven to 350°F. Line cookie sheets with parchment paper or silpat liners. Set aside.

2. In a large mixing bowl, beat shortening and nutella till smooth. Add granulated sugar, brown sugar, baking powder, and baking soda. Beat until completely incorporated. Add egg, milk, and vanilla and mix well again. Slowly add flour and mix until no dry streaks remain.

3. Scoop out rounded tablespoons (I use a small scoop so all the cookies are uniform in size) and roll them into balls. Roll the balls in the 1/4 cup of granulated sugar and place on prepared cookie sheets, 2 inches apart. Bake until edges are set, about 8-10 minutes.

4. As soon as you remove cookies from oven, press kisses into the center of each cookie. Let cool completely on wire rack. Enjoy!

Friday, February 15, 2013

Chocolate Peanut Butter Cookies [Gluten Free]

So it's been 8 months since I have been eating gluten free.  For the most part it's been relatively easy.  When it makes me feel so much better, it's easier to do the right thing and eat well.

But being this far out, I am starting to have some cravings.  Especially as the hubs pulls out freshly baked chocolate peanut butter cookies (just last night--I might add!).  My mouth starts to water and I really want one of those bad boys with a cold glass of milk.

I have so far resisted my cravings but I was on a mission to make a cookie that I could have and one that doesn't require the "gluten free flours" that are very hard to find where I live.  So after 4 batches and lots of input from friends (thanks guys!) I have decided this is the one.  

I love it.  And the best part is that it is super easy and all the ingredients are basics from your kitchen.  Saaweeet!!

 And this cookie is amazing with Reeses Chocolate hearts on the top, mmmm....I think I will go have one right now.

Chocolate Peanut Butter Cookies [Gluten Free]

(click here for printable version)

1 cup brown sugar, packed
1 cup creamy peanut butter
1 tsp vanilla
1 egg
1/4 cup cocoa powder
Mini Reese's Peanut Butter Cups or Hershey Kisses

1. Preheat oven to 375°F.  Line baking pans with parchment paper or silpat liners.  Set aside.

2. In a medium bowl combine brown sugar, peanut butter, vanilla, egg, and cocoa powder using electric handheld mixer.  Mix well.  Roll a heaping tablespoon of dough into a 1½-inch ball and place on your prepared baking sheets. Repeat with the remaining dough, spacing the balls about 2 inches apart and putting 12 on each sheet.

3. Bake for 9 minutes (dough will be soft but remove promptly). Remove from oven, place a peanut butter cup or kiss in the middle of the cookie, pressing it into the cookie. and let cool completely slightly on pan before placing on cooling rack to cool completely. Enjoy!

Monday, January 21, 2013

Strawberry Valentine Sandwich Cookies

Pin It
 Anyone thinking about Valentine's Day yet?

I know right. Christmas just got over and now another holiday!?

I actually really like Valentine's Day...now anyway.  We keep it pretty low key around our house which is why I probably enjoy it.

We always have crepes for breakfast (I know super healthy right--but hey we love them), my parents get them a little surprise goody bag, and we make them homemade valentines cards that they get at dinner with a fancy table that is decorated just for them.

I use to try and make a really fun dessert but I gave them up several years ago.  Nobody cares too much since I have been making valentines treats for at least a month before the holiday.  Like these fun cookies.  They are super, super, super easy, pink (which is perfect for Valentines) and every kid loves a sandwich cookie. It's two cookies in one and so delicious!

Strawberry Valentine Sandwich Cookie

(click here for printable version)

Cookies:
1 package of strawberry cake mix
2 eggs
3/4 cup of shortening

Frosting:
4 oz. cream cheese
3 tbsp butter, softened
1 tsp vanilla
2-3 cups powdered sugar

1. Preheat oven to 350°F. Mix cake mix, eggs, and shortening (and yes it needs to be shortening, butter and margerine, don't work well at all) together. The dough will be stiff, but mix until the ingredients are completely incorporated.

2. Roll into balls of equal size (a small scoop works great for this), place on greased cookie sheet (or use your silpat liner), and bake for 8 minutes. Immediately transfer to a cooling rack and let cool completely.

3. To make the frosting, combine cream cheese and butter and whip with hand mixer until light and fluffy, about 1-2 minutes. Mix in vanilla.  Slowly add in powdered sugar, one cup at a time, until it reaches your desired consistency and is smooth and creamy.

4. To assemble, put a dollop of frosting on the bottom of one cookie and top with another one that is the same size. Repeat with remaining cookies. Makes about 12-15 sandwich cookies.  Enjoy!

Friday, December 7, 2012

Turtle Thumbprint Cookies

I feel like I live in the Northwest.

We have had no sun for a week now and just a constant raining drizzle all day long.  Now I am beginning to know how all you peeps feel with never seeing the sun!

But I guess it's not all that bad.  When we have to stay indoors all day long it just makes me want to bake.  I love the kitchen all warm, with delicious smelling things in the oven, a sink full of dishes, Christmas music playing in the background, and a cold diet coke waiting for me.  

Ahh...the life.

It does make me pretty happy on rainy days though (and then everyone else is happy too--right!!)

These beauties came from one of those days.  Wow! were they a hit.  Everyone scarffed them right down.  The different layers of goodness were pretty awesome and I promise the nuts on them add the perfect crunchiness.  These would be perfect for your neighbors too.  They would love you forever.

Turtle Thumbprint Cookies

(click here for printable version)


Cookies:
1 egg, divided
1/2 cup butter, room temperature
2/3 cup sugar
2 tbsp milk
1 tbsp vanilla
1 cup flour
1/2 cup unsweetened cocoa powder
1/4 tsp salt

Caramel Filling:
16 caramels
3 tbsp heavy whipping cream

Toppings:
1 1/4 cups chopped pecans
1 tsp shortening
1/2 cup semi-sweet chocolate chips

1. In a large mixing bowl, beat butter with an electric mixer for 30 seconds and completely smooth.  Add sugar and continue beating until creamy and fluffy.  Add egg yolk, milk, and vanilla and beat until well combined.

2. In a separate medium bowl, sift flour, cocoa powder, and salt together.  Add flour mixture to the butter mixture a little at a time and beat until well combined. Wrap in plastic wrap and refrigerate for 2 hours.

3. While dough is chilling in the fridge, chop your pecans finely and unwrap your caramels. Heat caramels and whipping cream in a small saucepan over low heat until nice and smooth, stirring constantly.  Set aside to cool a little bit.

4. Preheat oven to 350°F. Lightly grease a cookie sheet and set aside.  Place your egg white in a bowl and slightly whisk. Take your dough from the fridge, form 1 inch balls, dip in your egg white, roll in the chopped pecans, and then place on prepared cookie sheet.

5. Bake for 10 minutes or until edges are set.  As soon as they come out of the oven, use a measuring spoon to create an indentation in the middle of each cookie. Spoon caramel mixture into the center of the cookies, being careful not to fill too full, remove to a wire rack and let cool (if the caramel has thickened too much, just reheat on low until it reaches a thinner consistency).

6. Once the cookies have cooled, melt chocolate chips and shortening in a microwave safe bowl by heating in 15 second intervals, stirring in between each time until chocolate is smooth.  Drizzle chocolate over the tops of each cookie.  Enjoy!

Source: Mom On Timeout

Friday, November 2, 2012

Peanut Butter Pudding Cookies

Well the dreaded fall colds have arrived at our house.

How about you?

Last year we all did great.  Even when school started.  Nothing.  It was awesome.

This year, WOW!  My kindergartner has had a cough since school started.  Poor guy.  Kindergarten is rough on the immune system.

Now the hubs and one of the girls are in the middle of it. Bummer.

So we are eating lots of soup around here and maybe a few of these babies (sweets are good for you right??!!).  I *heart* Reeses Pieces and anytime I find a recipes for them--it is a must make.  Combine that with a peanut butter cookie and HEAVEN.  The kids went nuts over them, so did all our guests.  Definitely a keeper.

Peanut Butter Pudding Cookies

(click here for printable version)


2 1/4 cup all purpose flour
1 tsp baking soda
1/2 tsp salt
1 (3.4 ounce) box instant vanilla pudding
3/4 cup unsalted butter, softened
1/2 cup creamy peanut butter
1/2 cup sugar
1/2 cup light brown sugar
2 large eggs
1 tsp vanilla extract
1 tbsp honey
1 cup milk chocolate chips
1 cup reese's pieces
1 cup peanut butter chips

1.  Preheat oven to 350°F. Line 2 cookie sheets with parchment paper or baking mats.  Set aside.

2.  In a medium bowl, whisk together flour, baking soda, salt and pudding; set aside.


3.  In the bowl of a stand mixer fitted with the paddle attachment, beat butter, peanut butter, sugar and brown sugar on medium speed until light and fluffy, about 3 to 4 minutes. Add eggs, one at a time, scraping down the sides of the bowl as needed. Add vanilla extract and honey and beat until combined. Reduce speed to low and add flour mixture, beat to combine. Add chocolate chips, reeses pieces and peanut butter chips and mix until incorporated.

4. Roll a heaping tablespoon of dough into a 1½-inch ball and place on your prepared baking sheets. Repeat with the remaining dough, spacing the balls about 2 inches apart, putting 12 on each sheet. Using your palm, gently flatten the dough balls until they are about ¾ inch thick.  Bake 10 minutes. Let cookies cool on sheets for 2 minutes before transferring cookies to wire racks to cool completely. Enjoy!

Source: Inside Bru Crew Life

Friday, September 28, 2012

Candy Corn Sugar Cookies

Are you talking about costumes or Halloween at your house yet?

We aren't talking about costumes (and I'm trying not to remind the kids because that just seems like too close to Christmas and I don't want to think about it).

But I have been seeing all sorts of amazing things around blogland for Halloween and it is making just a little bit excited.  Mostly for the food (you know how I L.O.V.E. fall food).  What can I say! :)

I decided to spice up our sugar cookie recipe for halloween and the kids loved it.  They thought life was pretty cool when they came home and found these beauties.  I love the look of candy corns (really hate to eat them) but I do think they are so cute.

I tried to do step-by-step instructions so hopefully this is helpful and you love them as much as we did!

Candy Corn Sugar Cookies


1 batch sugar cookie dough (I love this one)
Yellow and Orange food coloring (the paste works much better)
Optionals: sprinkles, sanding sugar, melted white almond bark

1.  Prepare your sugar cookie dough according to directions.  Once ready, divide dough into 3 equal portions.

2. Line a standard size loaf pan with plastic wrap, making sure the ends hangover.
3.  Leave one section of dough, as is, and color the other two sections.  One yellow and the other orange.  Gently press layer of uncolored dough into bottom of pan and smooth flat, keeping it at least 1/2-3/4 inches high.  If you are using a smaller batch of dough, just press it half way down the pan.  The important part is keeping the dough at least a 1/2 inch thick.
4.  Gently press yellow portion of dough on top of uncolored dough, and smooth flat.
5.  Repeat again with orange dough.
6.  Wrap plastic over dough and chill until firm, 30-60 minutes in freezer or 1-2 hours in fridge.  Or you can store the dough in fridge for 2-3 days before baking.
7.  When ready, remove plastic and dough from pan. Slice loaf into 1/4 inch slices. Trim top of slice to make straight line.  Cut each slice into triangle shape and dip top side in sugar if desired.
8. Bake according to sugar cookie directions.  Cool completely and then if desired, dip ends in almond bark or white chocolate and decorate with sprinkles.
Enjoy!

Source: Our Best Bites

Friday, September 7, 2012

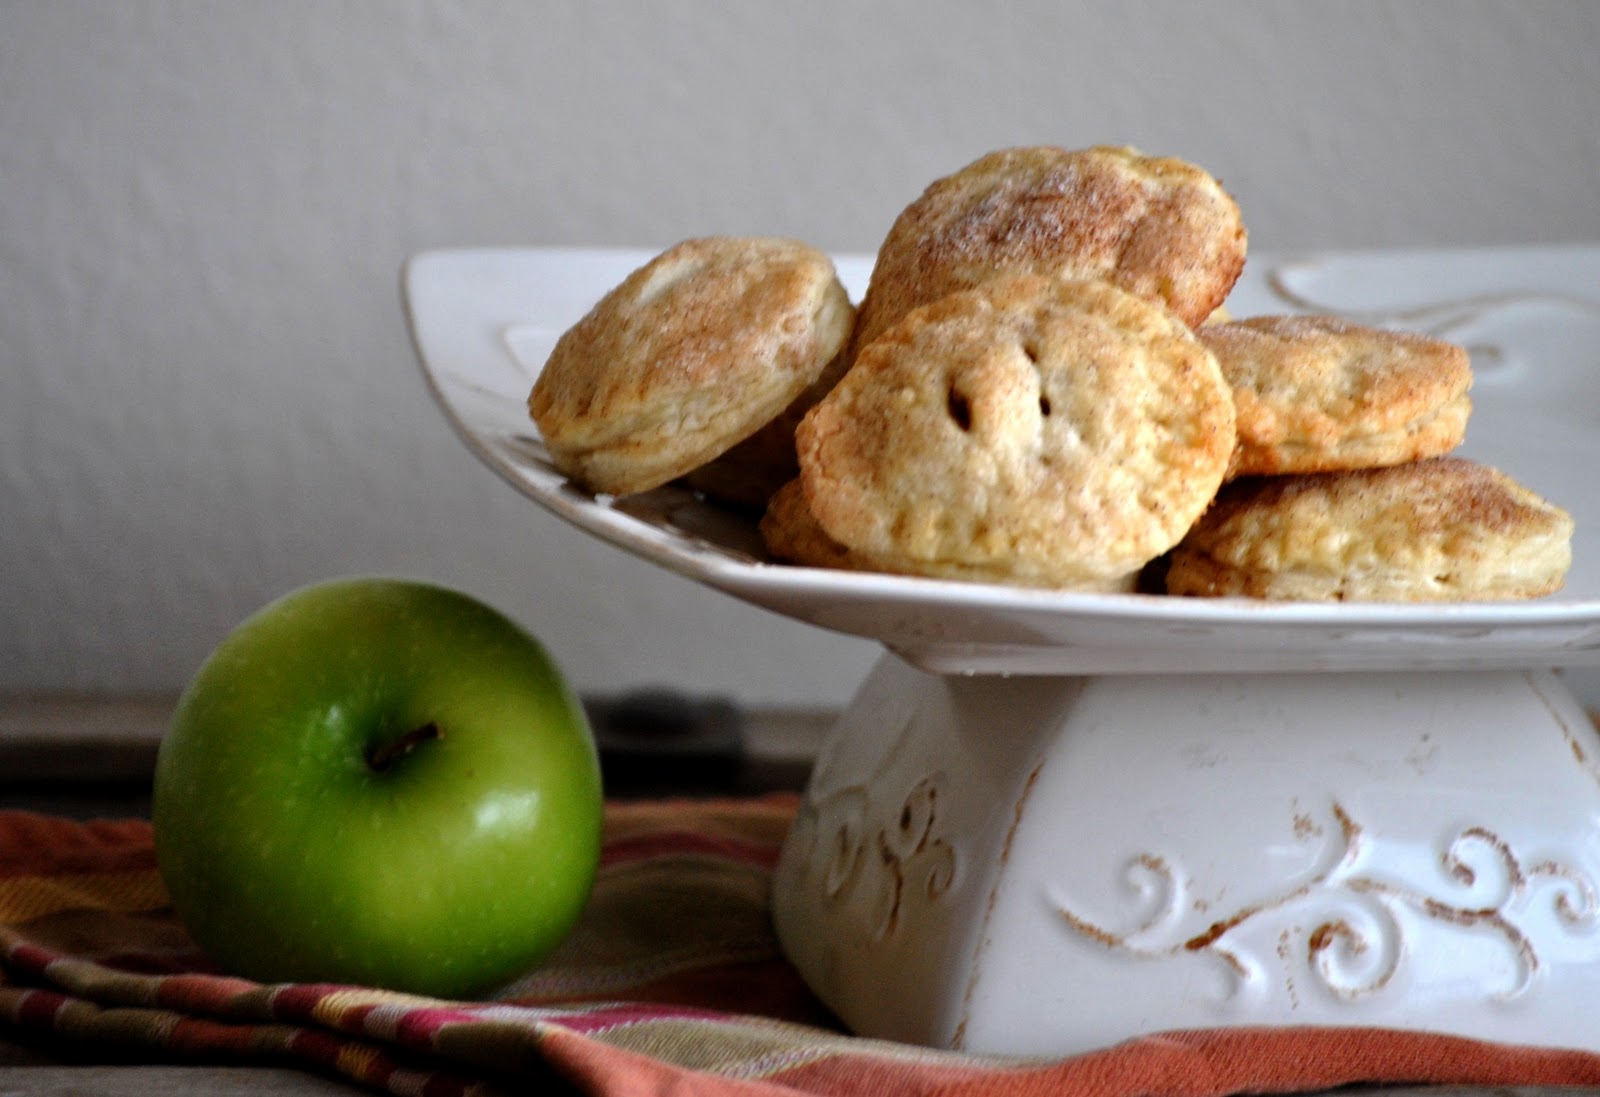
Apple Pie Cookies

 Yep--it's getting that time of year!!  And I am so super excited about it.

I love fall.  I love fall desserts.  I love the leaves changing colors and I love that we get to snuggle on cold mornings.  Ohh...I get chills just thinking about it because I love it so much.

Hand pies seem to be all the rage lately and this is a little different version of it.  Warm apples mixed with a flaky, cookie/pastry dough was absolutely amazing.  I made these before the gluten free days and I can attest that they were completely unbelievable.

I was in heaven and I have been saving them to share with you for months now because they are the perfect fall dessert.  Small, warm. cinnamony, delicious, and perfect with a scoop of ice cream.  

Apple Pie Cookies

(click here for printable version)


Dough:
2 1/2 cups all-purpose flour
2 tbsp granulated sugar
1 tsp salt
2 sticks butter, cold and cut into small pieces
1/2 cup very cold water

To assemble:
2-3 medium apples, whatever variety you prefer for baking (I used granny smith)
Squeeze of lemon juice
1/3 cup granulated sugar
1 tsp ground cinnamon
Dash of grated nutmeg
Water
1 large egg lightly beaten with 1 teaspoon of water

*Note--This can done with frozen, pre-made pie crust but I highly recommend using the homemade version.  It tastes so much better!

1.  To make the pie dough, combine the flour, sugar, and salt in a medium bowl and stir with a fork to blend. Using a pastry cutter, cut the butter into the flour mixture until the mixture is coarse and the largest pieces of butter are no bigger than small peas. Stir in the water and mix gently just until the dough has come together in a ball and all of the dry ingredients have been moistened. Form the dough into a disc and cover tightly with plastic wrap. Transfer to the refrigerator and chill for at least 1 hour.

2.  When you are ready to make your cookies, preheat the oven to 350˚F. Line baking sheets with silicone baking mats or parchment paper (or spray with non-stick cooking spray). Peel, core, and cut apples into bite size pieces. Put the apples in a bowl and toss with the lemon juice. Add the sugar, cinnamon, and nutmeg, and stir until all the apples are completely coated. Set aside.

4. To assemble the cookies, transfer half of the chilled pie dough to a lightly floured work surface, keeping the other half in the refrigerator. Use a rolling pin to roll the dough out very thin, about 1/8 to 1/4-inch thick. Using a large round biscuit or cookie cutter (about 2 1/2 inches in diameter), cut out round pieces of the pie dough. Transfer half of the rounds to the prepared baking sheet. Brush the rounds lightly with water (this will help the pies seal). Add a teaspoon of apple filling to each round. Layer a second round of dough on top of each apple slice and gently press the edges to help seal. Repeat this process with the remaining dough and apples.

5.  Crimp and seal the edges of the mini pies with the tines of a fork, dipping in flour if needed to prevent sticking. Lightly brush the tops of the cookies with the egg wash. Use a small paring knife to cut tiny slits in the top of each cookie. Sprinkle with additional sugar, if desired.  Bake for 25-28 minutes or until light golden brown.  Enjoy!

Source: Annie's Eats

Monday, August 27, 2012

Flourless Chocolate Almond Coconut Cookies

 I have heard many things about gluten free foods.  

For example: it's super expensive to buy the mixes and they don't taste very good at all, you need to try recipes many times to get it right, the rice flours taste like sandpaper, once you find a mix that works--stick with it, and the list goes on.

I haven't really experimented a lot yet with gluten free recipes, mostly because I have been trying to eat less carbs along with this gluten free thing (like spaghetti squash instead of gluten free noodles or cauliflower crust pizza --recipe to come soon because it was amazing!).

My mom sent me this link and I was very intrigued.  Nothing weird in it (like xanthum gum), just your normal everyday ingredients.  Now that's my kind of recipe.  And if you like almonds and coconut, you are going to be heaven.  These cookies with a cold glass of milk is to die for.  I could hardly stay out of them--so delicious.

Flourless Chocolate Almond Coconut Cookies

(click here for printable version)


1 cup unsalted slivered or sliced almonds
1 cup sweetened shredded coconut
1/2 cups + 3 tbsp unsweetened cocoa
3 cups powdered sugar
1/2 tsp kosher salt
4 whole egg whites, at room temperature and whisked together
1 tbsp vanilla extract
3/4 cup mini chocolate chips

1. Preheat the oven to 350ºF. Spread almond slivers and shredded coconut evenly on a large rimmed baking pan. Place in the oven and toast for about 7-8 minutes, turning/tossing once halfway through, until golden brown and fragrant. Remove from oven and set aside. Reduce heat to 325ºF.

2. In a large bowl whisk together cocoa, powdered sugar, and salt. Continue whisking while adding egg whites and vanilla extract, mixing until just moistened. Don’t overwhisk or the eggs will stiffen. Stir in almonds, coconut, and chocolate chips.

3. Line 2 large baking sheets with parchment paper or silpat liners (very important--they will stick). Spoon batter by the tablespoon onto the baking sheet. Bake for 14-16 minutes, turning pans and shifting the top to bottom rack halfway through. Cookies are finished when tops are shiny and cracked. Slide the cookies off the pans and allow to cool completely before removing. Enjoy!

Source: Tasty Kitchen

Friday, August 24, 2012

Ginger Crinkle Cookies

 Boy am I getting ready for fall!

I am ready for the weather to cool off, the chill in the air, clear skys (our skys have been full of smoke for 2 weeks straight now), and pumpkins.

But most of all I can't wait for all the wonderful things to bake that are full of cinnamon, nutmeg, and ginger (okay this is sounding like a pumpkin pie--maybe I'm just in the mood for some of that).

The other day I was in the mood for fall and we were in charge of desserts for a party so I thought why not, I'll just make some molasses cookies.  That always seems very fallish to me (plus lots less work than a pie).

These cookies were a huge hit.  Everybody had at least 3 of them (they're pretty healthy right?) and the adults went crazy over them.  The hubs said they were pretty awesome and a make again cookie.  Sweet!

Ginger Crinkle Cookies

(click here for printable version)


1/2 cup butter, softened
1 cup light brown sugar, packed
2 egg whites
1/4 cup molasses
1 cup whole wheat flour
1 cup all-purpose flour
1/2 tsp salt
2 tsp baking soda
1 tsp cinnamon
1/4 tsp ground ginger
1/8 tsp cloves
1/3 cup sugar, for rolling

1.  In the bowl of an electric stand mixer fitted with paddle attachment, beat butter, brown sugar, egg whites and molasses.  In a medium bowl, stir together the flours, salt, baking soda, cinnamon, ginger and cloves. Add the dry ingredients to the molasses mixture and mix until combined.

2.  Cover and chill the dough for at least 30 minutes.

3.  Preheat the oven to 375°F. Place the 1/3 cup sugar in a shallow dish. Form the dough into 1 1/2-tablespoon sized balls and roll each one in the sugar. Place 2 inches apart on lightly greased or lined baking sheets (lined with parchment paper or silpat liners). Bake for 8-10 minutes until the tops are crackly and the edges are set (don’t overbake or they will lose their chewy texture). Remove the cookies to a wire rack to cool completely.  Enjoy!

Source: Mel's Kitchen Cafe

Monday, August 20, 2012

Chocolate Zuchinni Cookies

 This is such a weird zucchini year for us.  

You see I usually plant 1 zucchini plant so I can have it on hand for summer recipes.  This year I decided I wouldn't do that since my friend Tara has had them coming out her ears (and she said I could have some :).  Well Tara moved away, this is me very sad :(, which meant all her zucchini plants were left with the new owners.

So here we are at the height of zucchini season and I have no zucchini.  So sad, huh!

I mean I could buy it...but really who buys zucchini this time year.  People are usually trying to give it away and leaving it on random people's door steps just to get rid of it.  But this girl...none.

I finally gave in and bought two at a farmer's market here in town so I could make these delicious cookies.  My kids even loved the zucchini in them--which they usually throw a fit about--but it makes the cookies so moist and delicious.  A perfect way to use up your extra zucchini, that is if you have any.

Chocolate Zucchini Cookies

(click here for printable version)


1/2 cup butter
1/4 cup vegetable oil
1/2 cup brown sugar
1/2 cup granulated sugar
1 egg
1 tsp vanilla
1 cup flour
1 tsp baking soda
1/2 tsp cinnamon
1/4 cup cocoa powder
3 cups quick oats
1 cup shredded zucchini (about 1 small)

1. Preheat oven to 350°F. Line two cookie sheets with parchment paper or silpat liners (or spray with nonstick cooking spray).

2. In a medium bowl, whisk together flour, baking soda, cinnamon, and cocoa. Set aside.

3. In the bowl of a stand mixer fitted with the paddle attachment, cream butter, oil, and sugars. Add egg and vanilla and mix on low speed until combined. Slowly mix in dry ingredients.  Add oats and mix on low speed. Continue mixing on low speed and add zucchini. Mix until well combined.

4. Drop by tablespoons onto cookie sheets. Bake 11-14 minutes until center of cookie no longer looks wet. Cool 10 minutes on cookie sheets before removing to cooling racks.  Enjoy!

Source: Crazy for Crust

Friday, August 3, 2012

Jello Cookies

Did you know it's my birthday tomorrow?

Yep it's true and we are going to celebrate by....probably watching the Olympics.

I do love to watch and if you have been following my Facebook page, you know that swimming, gymnastics, and volleyball are my favorites.

And it's a good thing they only come around every two years.  I have such a problem turning the tv off when I know the're on.  My poor house gets put on the back burner because I can "just do it later"!
Seriously, it's like I'm glued to it and don't want to miss out on a single event, especially when 6 channels have different events.  Oh my what do I watch!

Though I have found some time to make summer delicious food.  This was a hit with the kids.  They loved the bright colors and everybody loves Jello right?

Jello Cookies

(click here for printable version)

3 1/2 cups flour
1 tsp baking powder
1 1/2 cups salted butter softened
1 cup sugar
1 egg
1 tsp vanilla
4 (3 oz) pkg jello (any flavors you want)

1.  Preheat oven to 350°F.  Line your baking sheets with parchment or silpat liners. Set aside.

2.  Beat butter in large bowl with mixer until creamy. Add sugar and beat until light and fluffy. Blend in egg and vanilla. Mix flour and baking powder in a separate bowl. Gradually beat in flour mixture.

3.  Divide dough into 4 sections. Sprinkle 2 tbsp of jello onto each section. Knead together with dough (this is a great part to have help from your kids). If you want, you can add a few drops of food coloring to make the dough more vibrant.

4.  Shape dough into 1-inch balls. Roll in the extra jello from the packets. Place, 2 inches apart, on baking sheets and flatten with bottom of bowl.  Bake 8 to 10 min. Cool on baking sheets 2 min. Remove to wire racks and cool completely.  Enjoy!

Source: I Heart Naptime

Monday, July 30, 2012

Nutella Peanut Butter Monster Cookies

 I know, I know.  Another Nutella recipe.

But this bad boy is pretty much delicious in anything.  Heavens you don't even need to put it in anything, you could just lick it off the spoon.

After what I have been making this week, I think I should buy stock in Nutella.  Anybody with me on that!!??

I even have my kids addicted to it.  When we run out, they beg until I get more.  Pretty sad but it is super delicious and the favorite at Saturday morning breakfasts.  Kathryn thinks nothing is better than a pancake smeared with Nutella and Peanut Butter and topped with strawberries.  I know, but at least it's only once a week.

This particular cookie was brought to my attention by my new friend, Jill (you better leave a comment for this one :).  And oh my heavens, are they absolutely devilish.  I could not stay out of them.  Thank heavens I took them with me to the family reunion and they polished them off in hours.  They were absolutely amazing.  

So thanks Jill for making me gain like 7 pounds!

(okay that's not really true but I did have to go work out for 5 days in a row so I didn't :)

Nutella Peanut Butter Monster Cookies

(click here for printable version)

1/2 cup butter, softened
3/4 cup creamy peanut butter
1 cup Nutella
1 cup white sugar
3 eggs
1 tsp vanilla
2 tsp baking soda
2 cups old fashioned oatmeal
1 1/2 cups quick oatmeal
1/2 cup flour
1 cup Reeses Pieces
1 cup semi-sweet choclate chips
1 cup peanut butter chips

Note: If you are gluten free, adjust as needed.  I used regular all-purpose flour because I can handle a little bit, but do what you need.

1.  Preheat oven to 350°F.  In bowl of your stand mixer that is fitted with cookie paddles, cream butter, peanut butter, Nutella, and sugar until thoroughly combined.  Add eggs and vanilla and mix well again.  Add baking soda, oatmeals, and flour and mix until well incorporated.  Gently stir in Reeses Pieces, chocolate and peanut butter chips.

2.  Drop by tablespoon full on baking sheets and bake for 10-12 minutes.  Remove from oven and let sit 5 minutes before removing to cooling rack to cool completely.  Enjoy and good luck not eating all of them!

Makes: 4 dozen

Monday, July 16, 2012

Banana Reeses Cookies

 My oldest child turned 12 several weeks ago ("gasp"--I know, I know I can't be that old but it's true!!) and 12 is a big birthday at this house.  Not only does he get to have a major party with friends (notice the "get" part--this mama had a few too many things on her plate so he graciously let me schedule his party for the end of the month), he got to have lots of family come into town.

Some of the family brought bananas with them.  And it wasn't just a few bananas.  It was many of them.

Like 20!

Maybe that's not a lot to you but when they are all on the verge of being super ripe there was no way they were all going to be eaten by themselves.  Especially by this lady.  You see, I love bananas, but when they start to get really ripe, I can't even put them in my mouth.  Way too strong.  Anyway....

So because there were lots of people around and because there were lots of bananas around and Pinterest was open on the computer--we started baking away.

These cookies have one of my favorite things ever in them--Reeses Pieces, so delicious!  Not to mention you start with a cake mix so this recipe was so easy, peasy and the everyone assured me they were absolutely delightful.  The kids snarfed them up (and I ate the leftover reeses pieces--oh schucks!).

Banana Reeses Cookies


1 chocolate cake mix
1/2 cup butter, softened
2 brown, ripe bananas, smashed
1 tsp vanilla
1/2 cup miniature chocolate chips
1 cup peanut butter cups, chopped
1/2 cup Reeses pieces

1.  Preheat oven to 350°F.  In a mixing bowl, cream the butter, bananas, and vanilla. Slowly add the cake mix. The dough will be very thick. Stir in the chocolate chips, peanut butter cups, and Reeses pieces by hand, being carefully to not smash all the goodies.

2.  Drop by spoonfuls onto a baking sheet and bake for 10-12 minutes, or until set in the middle. Cool on the pan for about 1-2 minutes and then remove to a wire rack to cool completely. Store in an air tight container. Enjoy!


Monday, June 18, 2012

White Chocolate Macadamia Nut Cookies

Sometimes you just need an adult cookie.

My kids totally don't agree but I do.  I love it when they won't eat my desserts because it has "nuts" in it.  That word alone will make all my kids going running away as fast as they can.

I use to be the same way as a kid and as a teenager.  Now I have come to my senses and I enjoy almost all kinds of nuts (walnuts are still not my favorite but hey....), especially in desserts.  These german chocolate cookies with toasted pecans make my mouth water just thinking about them and then macadamia nuts.  Ahhh...so delicious.

And so not kid friendly.  Perfect for me. These cookies were absolutely delicious.  They are a perfect combination of cookie dough, white chocolate, and nuts.  The hubs and I loved them (and pretty much every adult in the room).

White Chocolate Macadamia Nut Cookies

(click here for printable version)

*makes about 60 cookies

3/4 cup unsalted butter, softened to room temperature
1/4 cup butter flavored shortening
1 cup brown sugar, packed
1/2 cup white sugar
3/4 tsp baking soda
1/2 tsp salt
2 eggs, at room temperature
1 tsp vanilla
2 1/2 cups all-purpose flour
4 oz. macadamia nuts, chopped
12 oz package white chocolate chips

1.  Preheat oven to 375°F.  Place silpat liners or parchment paper on cookie sheets or lightly grease cookie sheets.  Set aside.

2.  In bowl of stand mixer fitted with cookie paddle, beat butter and shortening for 30 seconds.  Add sugars, baking soda, and salt and beat until light and fluffy, about 1-2 minutes.  Add eggs and vanilla and mix thoroughly.  Add flour and mix until just combined.  Using a wooden spoon stir in nuts and white chocolate chips and distributed throughout.

3.  Drop by tablespoon onto prepared cookie sheets and bake for 8-9 minutes.  Remove from oven and let sit 3 minutes before transferring to cooling rack to cool completely.  Enjoy!

Source: Better Homes and Gardens
Blogging tips